 |
Ready Welder II #10000-CS By Bill "BillaVista" Ansell |
The Coolest Tool for AllThere aren't many products that are equally desirable whether you're a novice in a bone-stock 'wheeler or a hard-core rock racing pro with a six-figure buggy - but the Ready Welder II is just such a rare beast. It might just be the coolest tool ever - here's why: |
 |
HistoryThe founder of the Ready Welder company, a U.S. WWII veteran, originally conceptualized a portable welding machine for military use during his time as a battlefield surgeon. The idea lay dormant until, in the early 1990's, a man approached him with a design for a light-duty machine that used a drill to power the wire feed mechanism. The idea was good, but the execution required some perfecting as the original product was difficult to use and somewhat limited. From this original idea the first Ready Welder was developed in 1997. Despite significant improvements over the original idea, this first Ready Welder design did not meet the stringent and rigerous requirements of the U.S. military. After significant re-design and testing, the current product, the Ready Welder II, was born sometime in 2002. Due to its compact design and powerful capabilities it was quickly adopted for military service and today many U.S. military service Humvees and tank service vehicles are equipped with a RW-II!! With that kind of pedigree, you'd think there would be a Ready Welder II in just about every offroad rig out there. Believe it or not, I think the reason there isn't is that the product is actually too good! WTF do I mean by that? In a nutshell, the claimed performance and specs for the Ready Welder II are so high, they're almost unbelievable. Until I got my hands on one, I, like most people, thought - "there must be a catch - how can something that small be so good? How can it possibly do all that?" After all - remember when Mom taught us that "If it seems too good to be true - it probably is"? Well, Mom was wrong! Models and Specs |
|
 |
The RWII is a powerful, portable, battery-powered wire-feed welder that can be used for flux-core (FCAW) and MIG (GMAW) welding of mild steel, aluminum and stainless steel. It can also be connected to an existing welding machine and used as a spool gun. | |||||||||||||||||||||||||||||||||||||||||||||||
 |
There are several different models available, as indicated on the box. All have the same basic functionality - the difference is in the primary method of attaching each to a power source. |
|||||||||||||||||||||||||||||||||||||||||||||||
 |
The basic battery-powered model is the Model# 10000. It is designed primarily to be connected to batteries for power, as follows:
It can also be connected to a constant voltage MIG machine for use as a spool gun. Most MIG welding machines are constant voltage, and we'll cover this type of connection in greater detail a bit later.
|
|||||||||||||||||||||||||||||||||||||||||||||||
 |
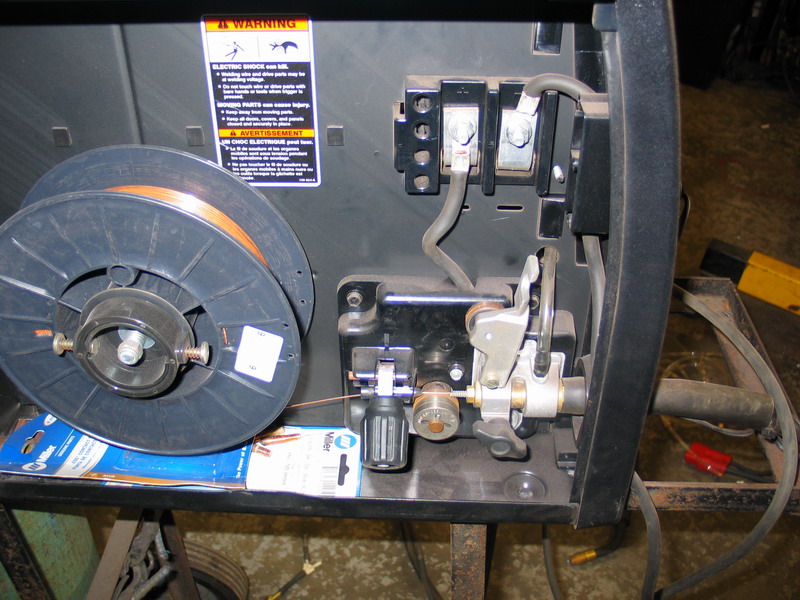
The Ready Welder II Model# 10000-ADP is the same as the Model# 10000, with the addition of a 110v powered AC/DC converter/power supply. This power supply allows the Model# 10000-ADP to be connected to constant current welding machines (such as most AC/DC stick welding machines) in addition to constant voltage MIG machines like the #10000. This small power supply is plugged into 110v household service and produces the constant DC voltage required to run the gun controls (circuit board and wire-feed motor). You can see the 110v powered AC/DC converter/power supply sitting just to the right of the case in this pic. |
|||||||||||||||||||||||||||||||||||||||||||||||
 |
The Ready Welder II Model# 10250 is very similar to the Model# 10000-ADP in that it includes the 110v powered AC/DC converter/power supply so that it can be connected to both constant voltage MIG machines and constant current stick machines. The difference is in the cabling. The model# 10250 is designed for those that intend to use it primarily as a spool gun attached to an existing welding power supply. As such, it doesn't include its own ground clamp because in spool gun configuration, the ground clamp of the welding power supply (MIG or stick machine) is used. Because it is intended to be used primarily as a spool gun, the attachments are also optimized for this configuration - the #10250 can be used with batteries, but additional cabling not supplied in the kit would be required. In this pic, you can see the quick-disconnect style cables supplied for optimal connection to an existing welding power supply. |
|||||||||||||||||||||||||||||||||||||||||||||||
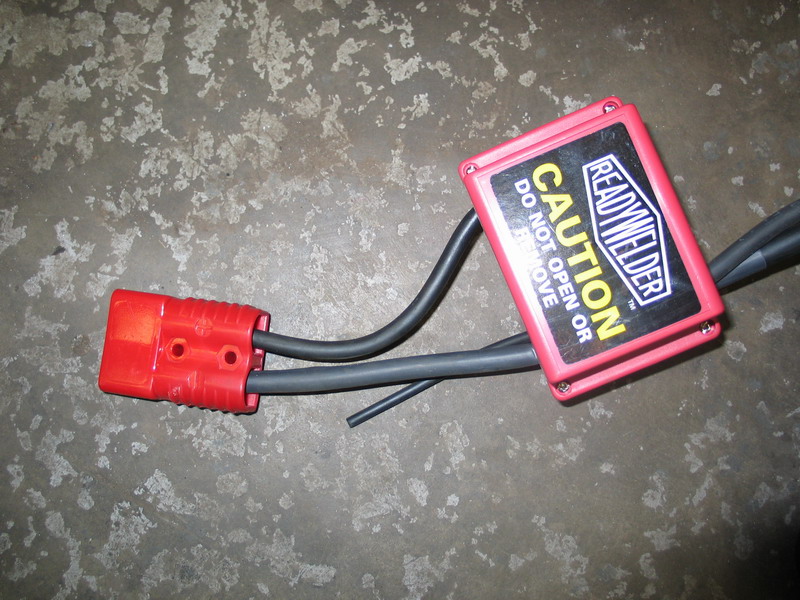
Cold Switch OptionPictured below is the "cold switch" box which can be added as an option to any Ready Welder II model. Without the cold switch option, the tip of the RWII welding gun is live at all times when the Ready Welder is connected to a power supply. That means that an arc can strike and current can flow, whether or not the trigger is pulled. In other words, when you have finished welding, if the gun nozzle accidentally contacts any metal part connected to the ground clamp, and accidental arc will be struck. Consequences of this range from annoying to a possible safety hazard, depending on the circumstances. This situation can be avoided with the addition of the cold switch. |
||||||||||||||||||||||||||||||||||||||||||||||||
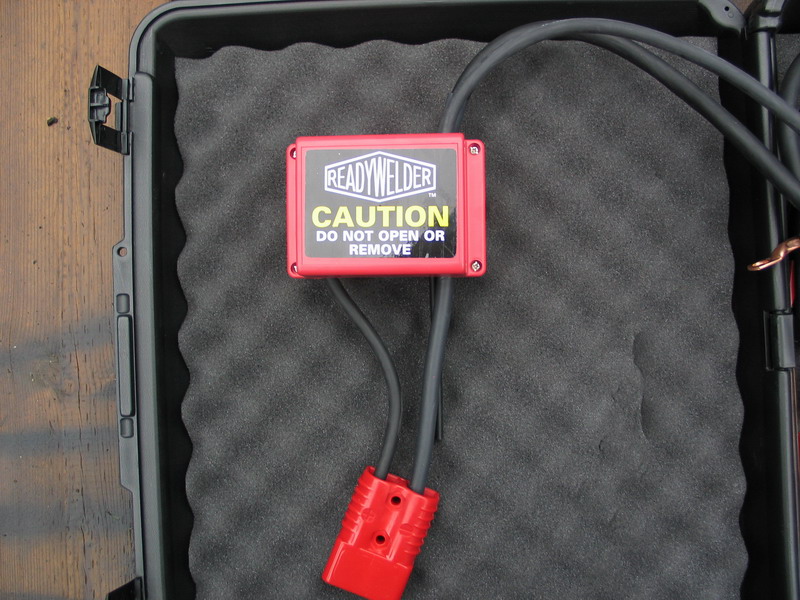 |
The cold switch is contained in a 3" x 5" box that is integrated into the Ready Welder's power cable, near the quick-disconects. The box contains a solenoid system that is operated by the gun trigger. Releasing the gun trigger deactivates the solenoid, disconnecting power from the welding gun. As a result, the end of the gun is only "live" when the trigger is pulled, much the same as any MIG machine. With the cold switch option you can move the gun into or out of confined spaces or lay it down without having to be concerned about striking an accidental arc. The cold switch option is indicated by the letters "-CS" appended to the end of any model number. |
|||||||||||||||||||||||||||||||||||||||||||||||
Note that all Ready Welder II models, regardless of the power source they are connected to, use DC power for welding. You cannot connect any of them to an AC only welding machine like the cheap stick welding "buzz boxes". In summary, the possible connections / power sources are:
Common Specification & Kit ContentsAll Ready Welder II models share these common specifications:
Each of the three different models also share these common kit contents:
|
||||||||||||||||||||||||||||||||||||||||||||||||
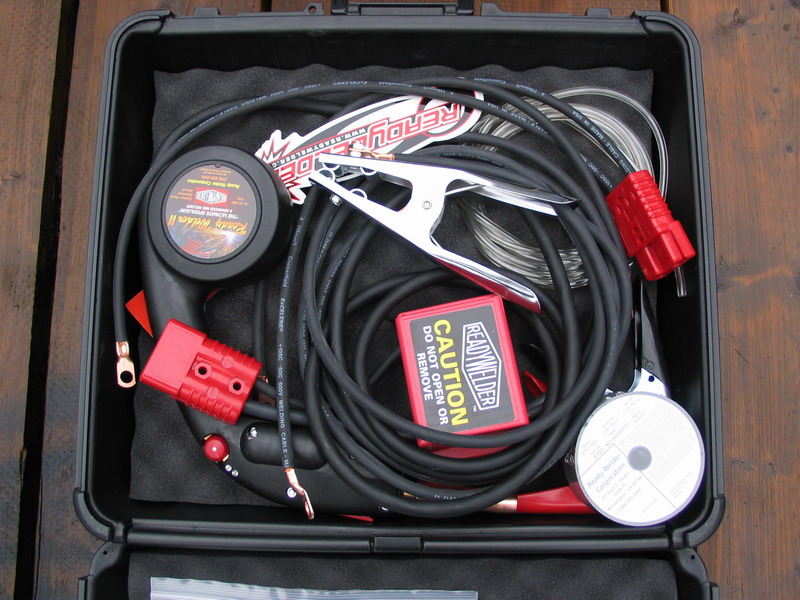
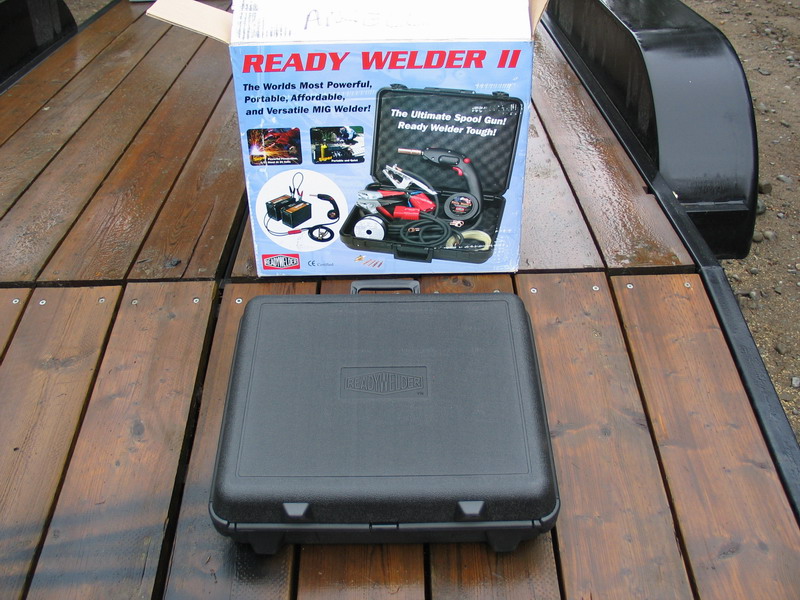
Ready Welder II Model# 10000-CS KitI chose the Model# 10000-CS for two reasons. First, my primary intended use is as a portable welder I can take on the trail, which means most of the time I will be using batteries as the power supply. Second, my existing shop welder is a constant voltage MIG welder, to which I can connect the #10000-CS for use as a spool gun for welding aluminum & stainless, as well as for those occasions when I need to weld thicker mild steel (1/2" and up) than the Miller can handle. Let's have a detailed look at the #10000-CS: |
||||||||||||||||||||||||||||||||||||||||||||||||
 |
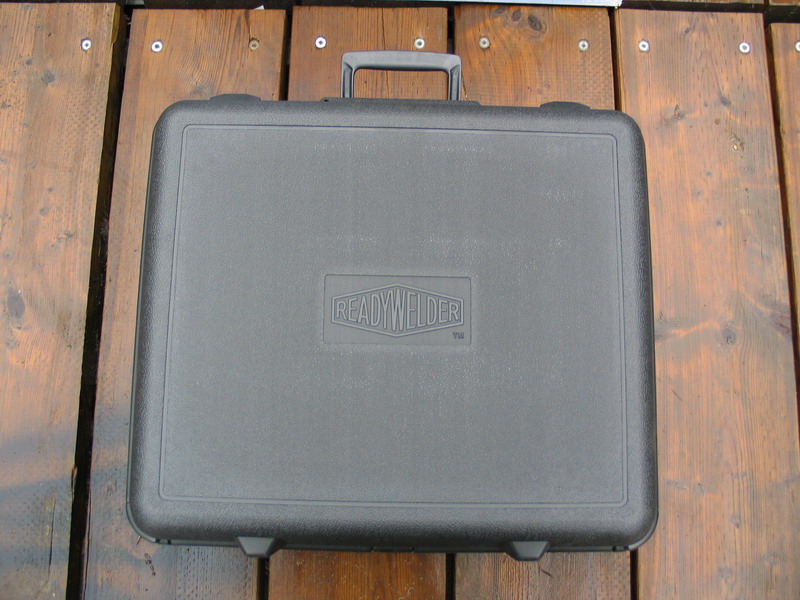
Inside the box is the blow-moulded, briefcase-style, carrying case. | |||||||||||||||||||||||||||||||||||||||||||||||
 |
The case measures 19.75" x 18", is 5½" thick, and weighs in at about 17lbs fully loaded with a 1lb spool of wire installed. | |||||||||||||||||||||||||||||||||||||||||||||||
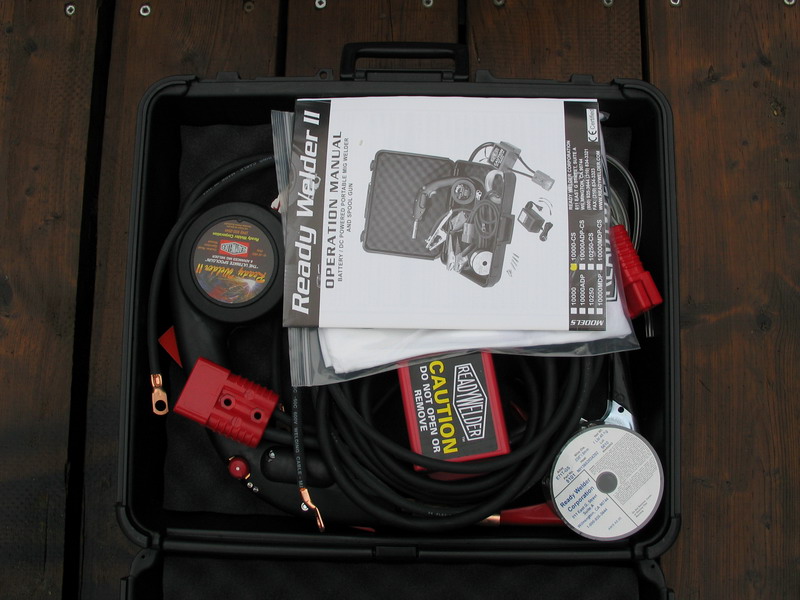 |
Inside the case the welder components and the instruction manual are neatly packed. | |||||||||||||||||||||||||||||||||||||||||||||||
|
The case is small enough to be highly portable, but large enough that the contents can be re-packed without the need to perform Chinese algebra combined with Indian yoga to get them all to fit back in. | |||||||||||||||||||||||||||||||||||||||||||||||
 |
I couldn't resist this cool T-shirt! | |||||||||||||||||||||||||||||||||||||||||||||||
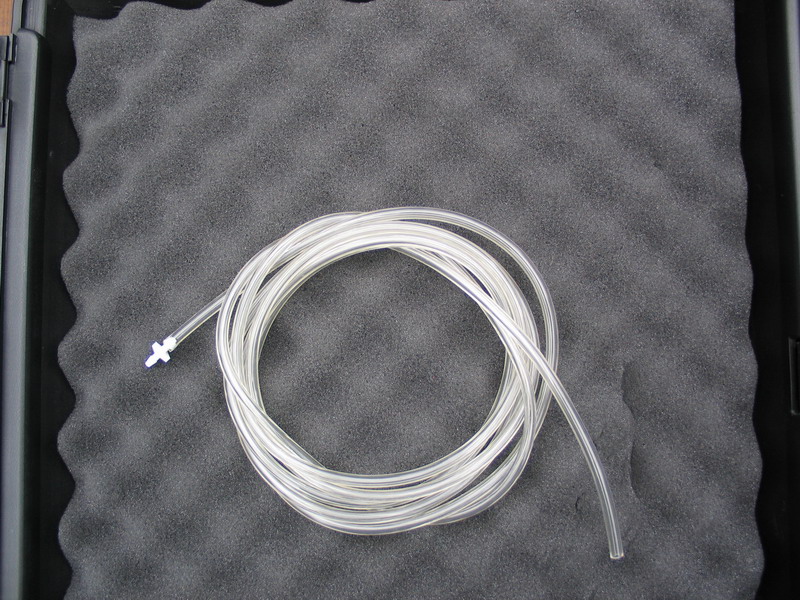 |
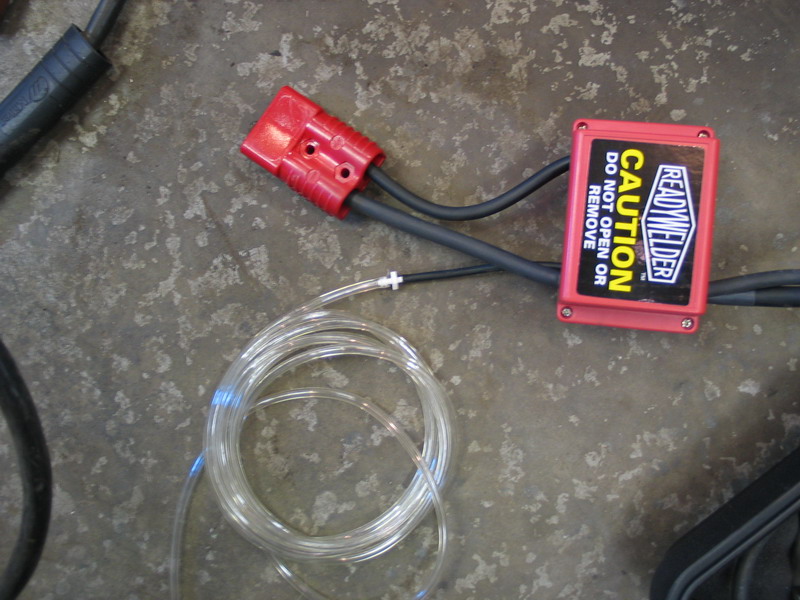
This is the 10-foot gas hose. The open end fits over the gas fitting supplied in the kit, and the small plastic nipple attaches the hose to the RWII cables near the quick-disconnect. | |||||||||||||||||||||||||||||||||||||||||||||||
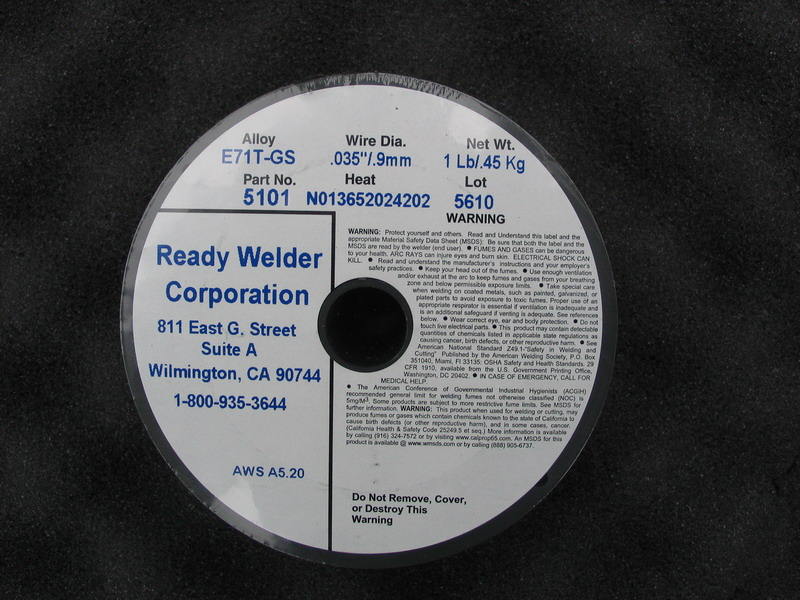 |
The kit ships with a one pound spool of .035 flux-core wire. | |||||||||||||||||||||||||||||||||||||||||||||||
|
This is the cold switch and power cable quick-disconnect. If you look closely, just underneath the thicker (+) cable you can see the small gas hose into which the white plastic fitting on the end of the clear gas hose fits. |
|||||||||||||||||||||||||||||||||||||||||||||||
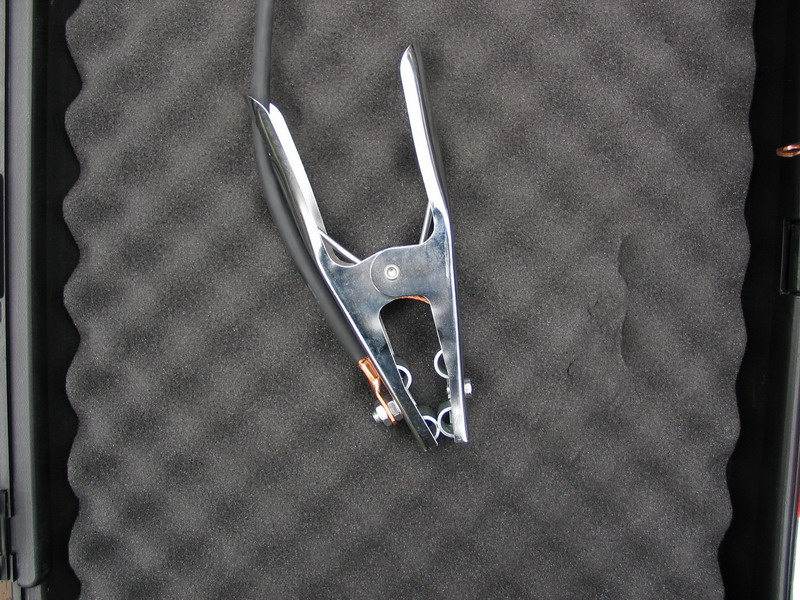 |
The ground clamp. | |||||||||||||||||||||||||||||||||||||||||||||||
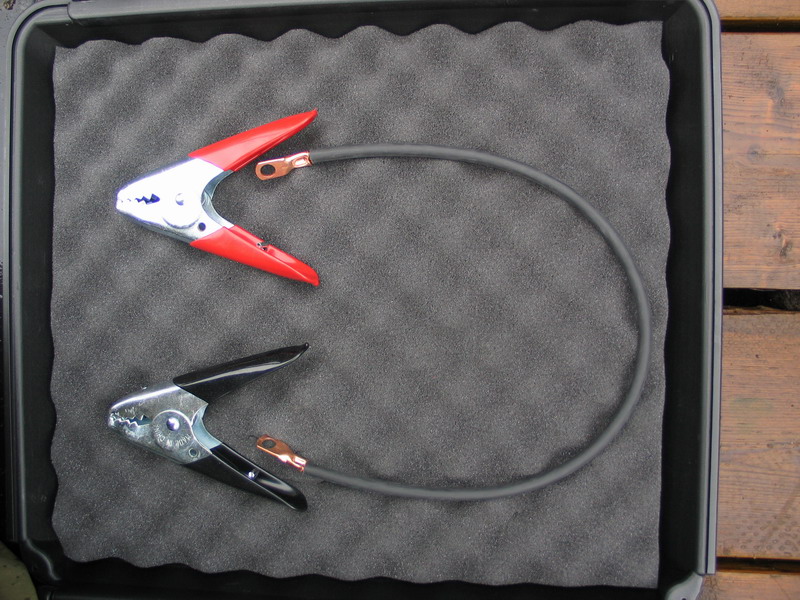 |
The "series" cable, for connecting the negative terminal of one battery to the positive terminal of another when connecting the batteries in series to produce 24v power. The supplied battery terminal clamps can be used either with this cable, or can be used to attach the RWII's (+) and (-) cables to the remaining battery terminals. |
|||||||||||||||||||||||||||||||||||||||||||||||
 |
Close up of the red (+) clamp. | |||||||||||||||||||||||||||||||||||||||||||||||
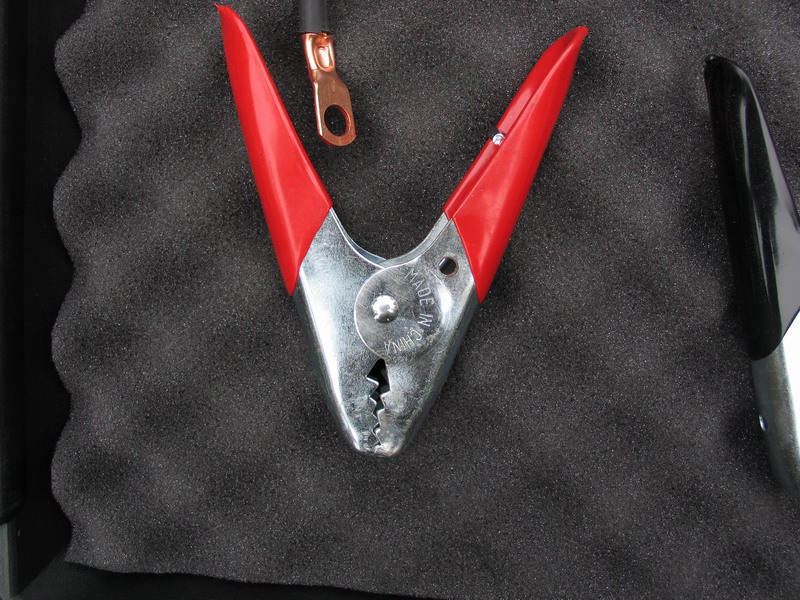
 |
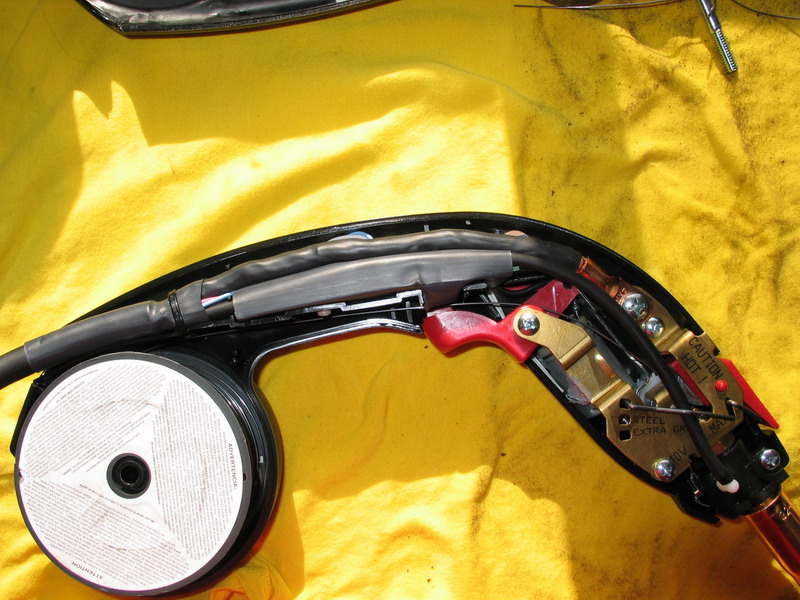
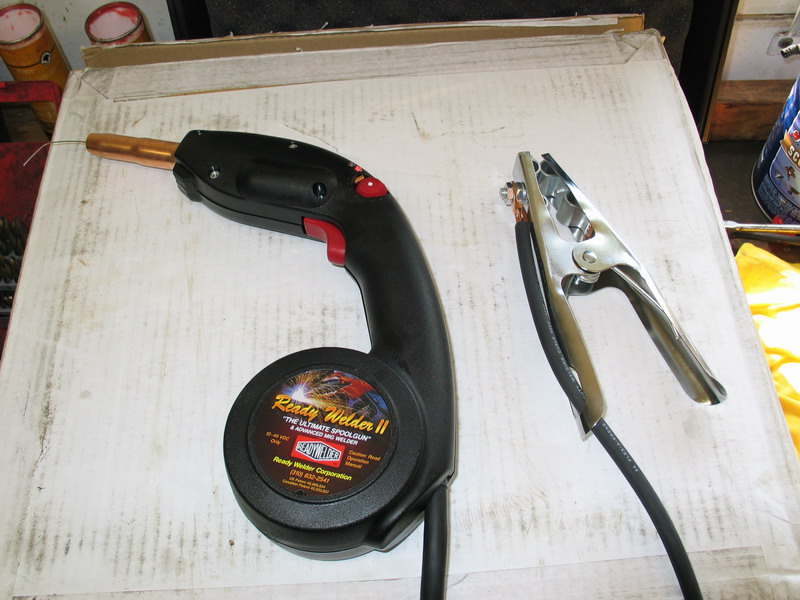
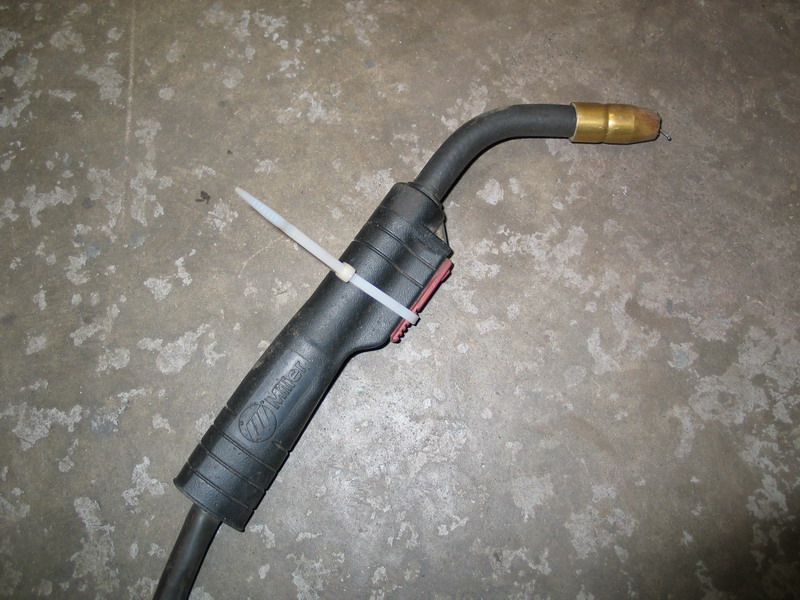
The RWII wire feed welding gun. The one or two pound spool of welding wire is housed in the circular pod at the butt of the grip. | |||||||||||||||||||||||||||||||||||||||||||||||
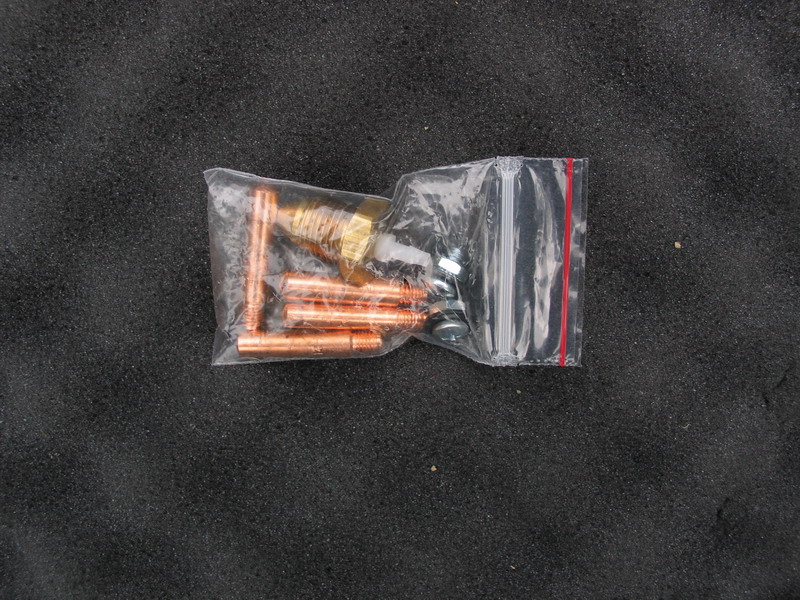 |
Inside the kit you will find a small plastic accessory bag, containing... | |||||||||||||||||||||||||||||||||||||||||||||||
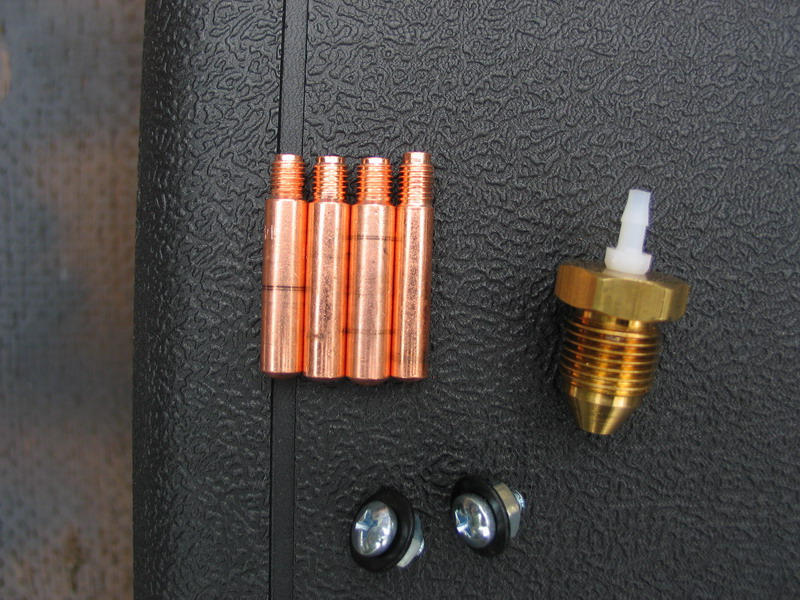 |
One .023 tip, one .045 tip, and two .035 tips, along with the gas fitting (which screws into your gas-supply regulator) and two small screws for attaching the cables to the battery terminal clamps. | |||||||||||||||||||||||||||||||||||||||||||||||
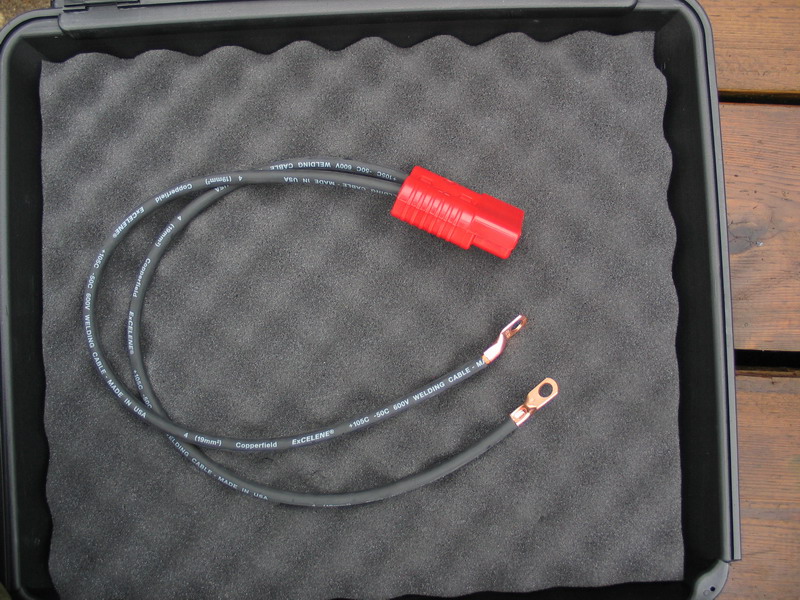 |
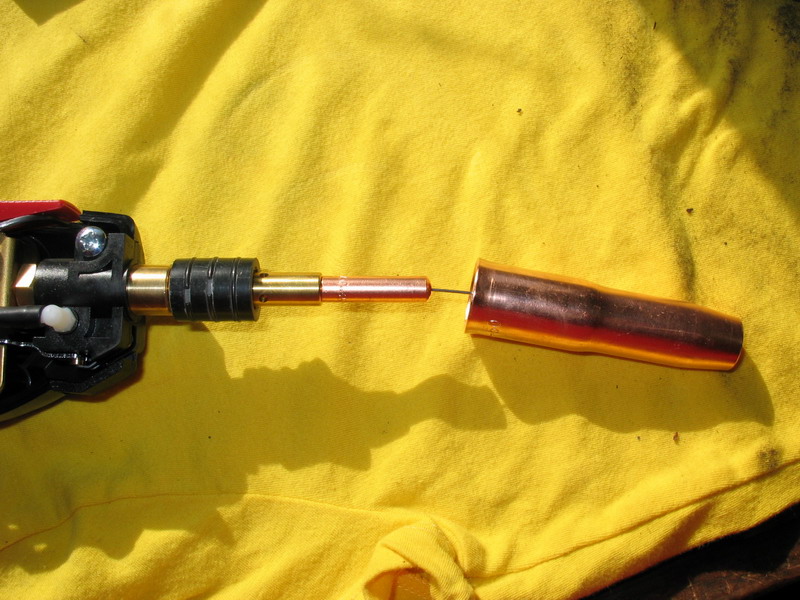
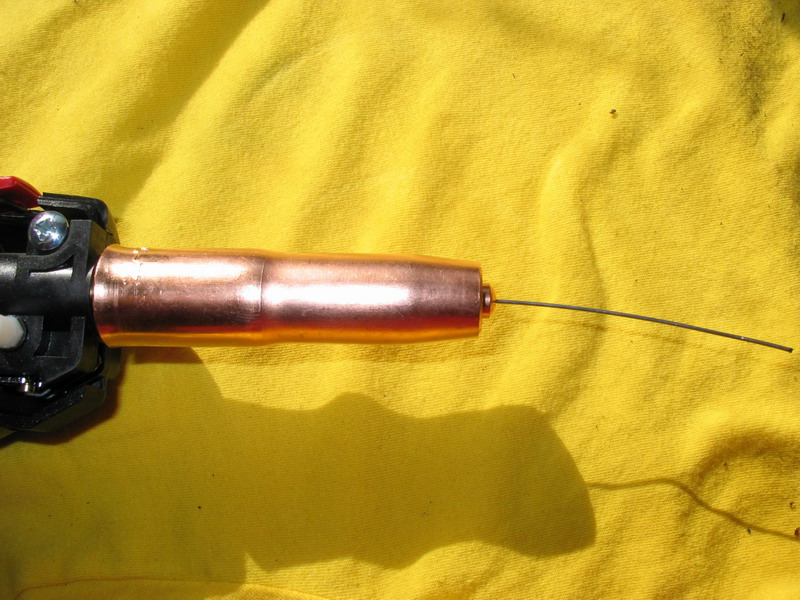
This is the short end of the RWII's power cables. The copper terminal lugs are attached to the (+) and (-) terminals of the batteries. The gun's power cable is then plugged into the red quick-disconnect and the RWII is powered and ready to weld. Let's load up a spool of wire and then we'll cover the cable connections in detail. |
|||||||||||||||||||||||||||||||||||||||||||||||
Loading the RWII With Wire |
||||||||||||||||||||||||||||||||||||||||||||||||
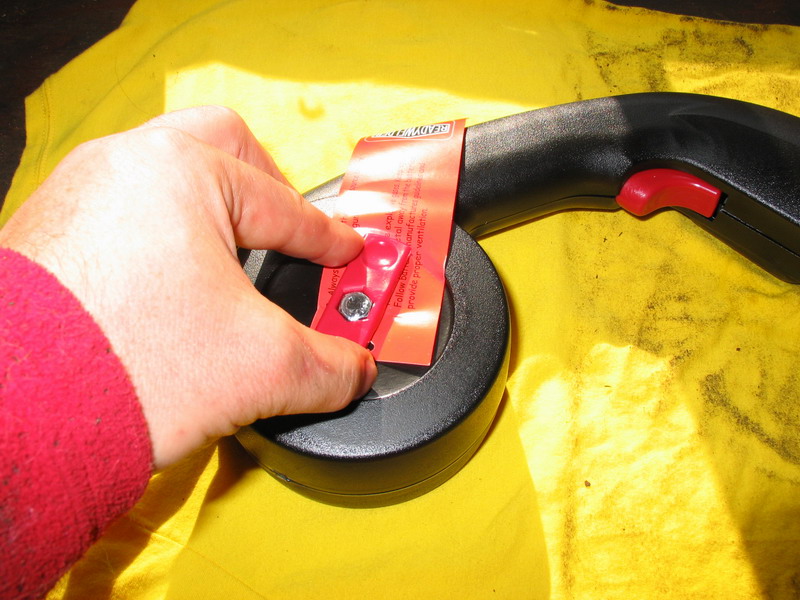 |
Before beginning, make sure the RWII's power cables are disconnected at the red quick-disconnect and that there is no power to the gun. There is a large thumb-screw that secures the two halves of the gun assembly together, called the T-bolt |
|||||||||||||||||||||||||||||||||||||||||||||||
 |
Unscrew and remove it... | |||||||||||||||||||||||||||||||||||||||||||||||
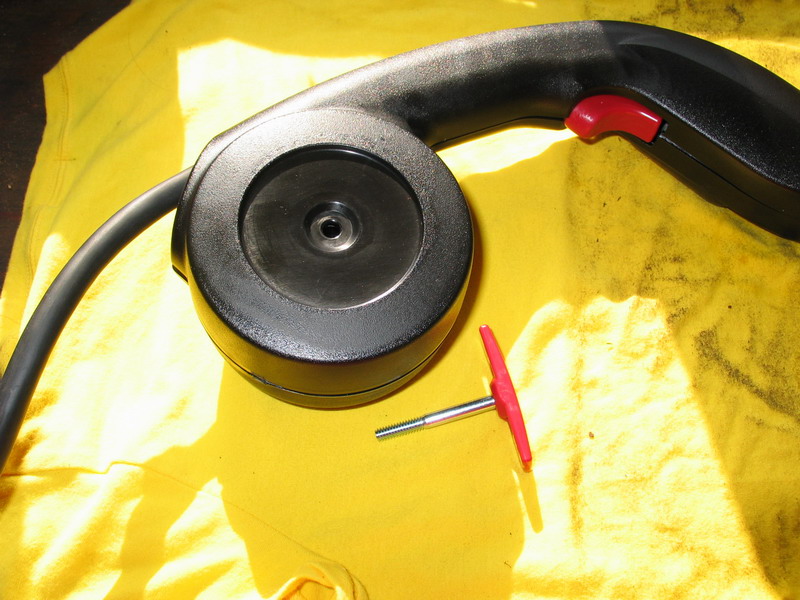
 |
...and then carefully separate the two halves of the gun assembly case. | |||||||||||||||||||||||||||||||||||||||||||||||
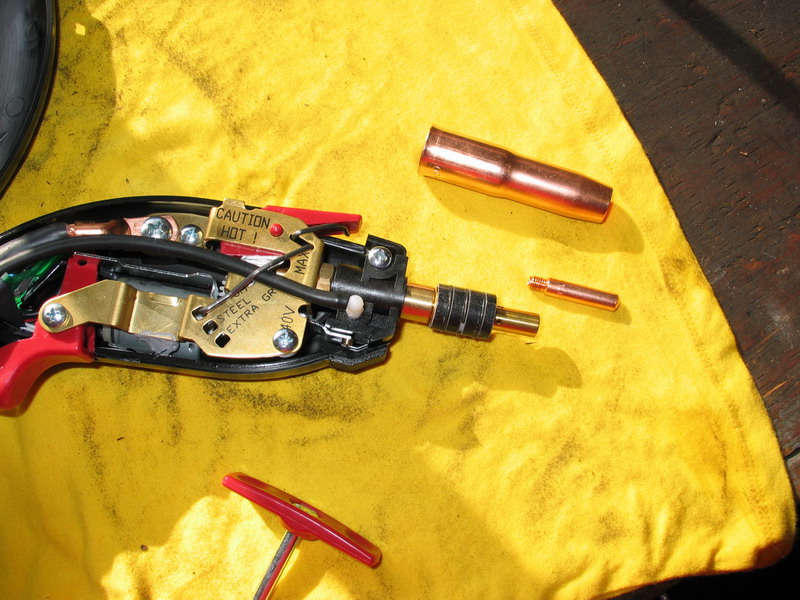 |
Pull of the nozzle, and then unscrew the welding tip from the gas diffuser. | |||||||||||||||||||||||||||||||||||||||||||||||
 |
Remove the gas diffuser from the gun. | |||||||||||||||||||||||||||||||||||||||||||||||
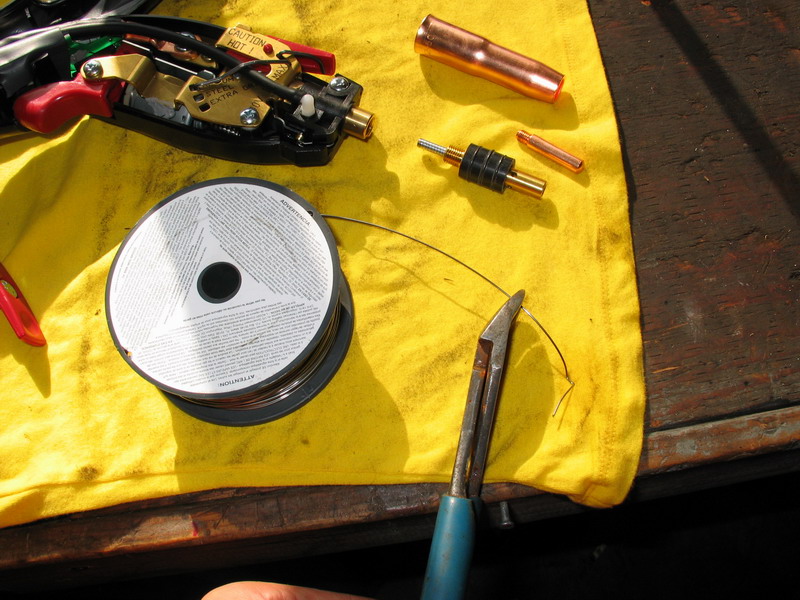 |
Unclip the end of the wire from the spool and, while keeping tension on the wire (not shown in this pic as my other hand is holding the camera!), clip off the end of the wire with wire cutters. |
|||||||||||||||||||||||||||||||||||||||||||||||
 |
While keeping tension on the wire so it doesn't unravel and birds-nest, insert the wire spool in the gun by placing it over the small post. Pull out some wire and route it as shown in this pic, towards the feed roller mechanism. |
|||||||||||||||||||||||||||||||||||||||||||||||
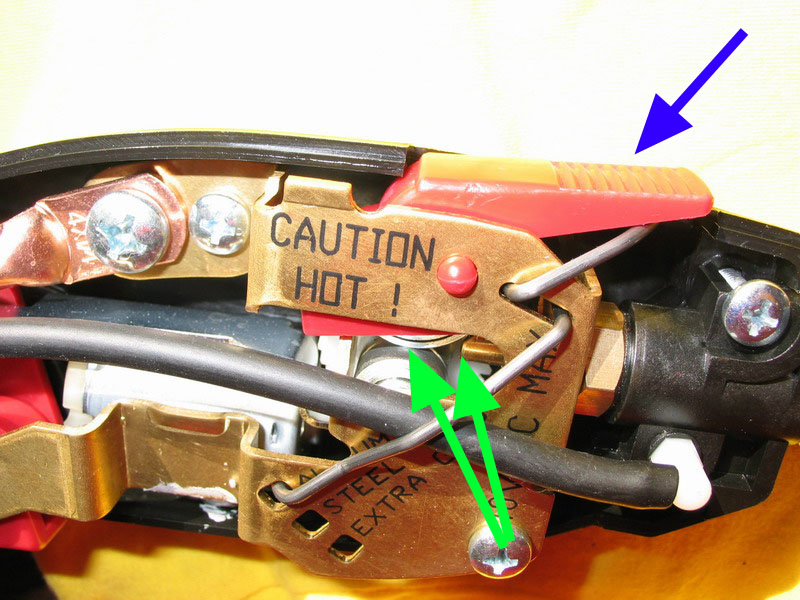 |
Press down on the red tension lever (blue arrow) to release tension, then feed the wire between the rollers and into the slot (green arrows)... | |||||||||||||||||||||||||||||||||||||||||||||||
 |
...until it comes out of the end of the gun. make sure the wire feeds smoothly and easily. |
|||||||||||||||||||||||||||||||||||||||||||||||
 |
Pull out a few inches of wire, and then release the tension lever. Slide the gas diffuser over the wire and screw it into the end of the gun. |
|||||||||||||||||||||||||||||||||||||||||||||||
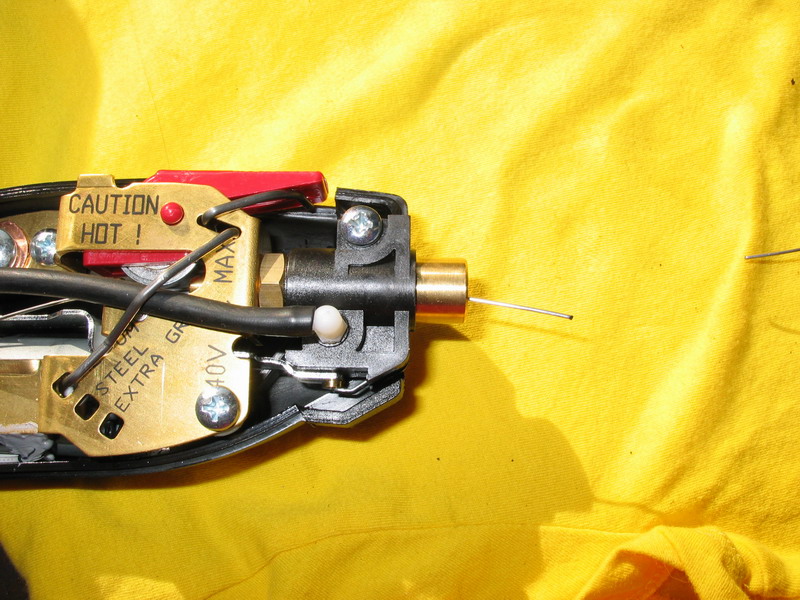
 |
Slide the welding tip over the wire and screw it into the gas diffuser. | |||||||||||||||||||||||||||||||||||||||||||||||
 |
Slide the nozzle over the wire and press it into place on the gun. | |||||||||||||||||||||||||||||||||||||||||||||||
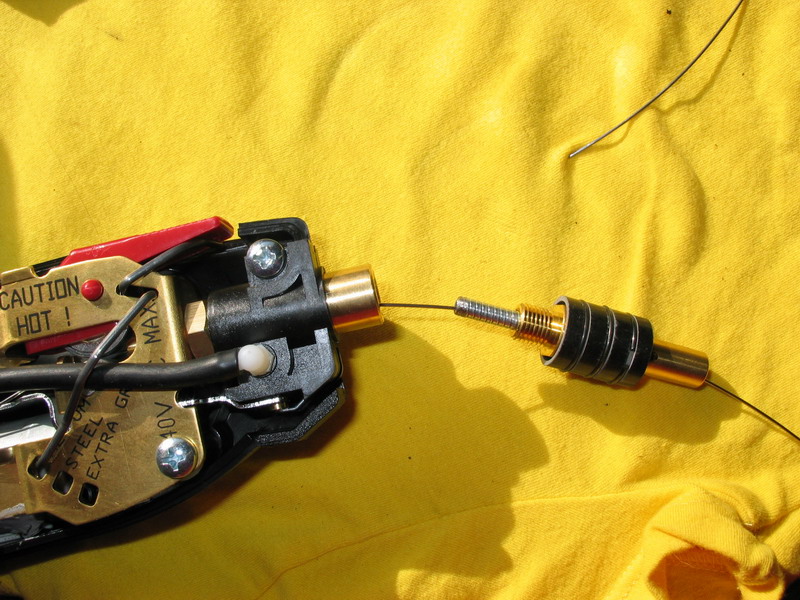
 |
For welding steel, the nozzle should be pushed almost all the way onto the gun so that the tip protrudes slightly. Be sure to leave a small gap between the back end of the nozzle and the plastic face of the gun so that heat will not be transferred directly into the plastic and damage the gun. For welding Aluminum, when pushing the nozzle on, leave a larger gap between the base of the nozzle and the gun so that tip is slightly recessed in the nozzle. |
|||||||||||||||||||||||||||||||||||||||||||||||
 |
Before closing the gun up and welding, adjust the wire feed tension for the job at hand. Using a pair of pliers pull the end of the adjusting spring out of its little square slot and insert it back into the appropriate slot. There are three slots, labelled
|
|||||||||||||||||||||||||||||||||||||||||||||||
|
Double-check the wire routing, then fit the two halves of the gun case back together... | |||||||||||||||||||||||||||||||||||||||||||||||
 |
...and reinstall theT-bolt. Do not over tighten the T-bolt as doing so will cause difficulty in wire feeding. |
|||||||||||||||||||||||||||||||||||||||||||||||
Connecting the RWII to Batteries. |
||||||||||||||||||||||||||||||||||||||||||||||||
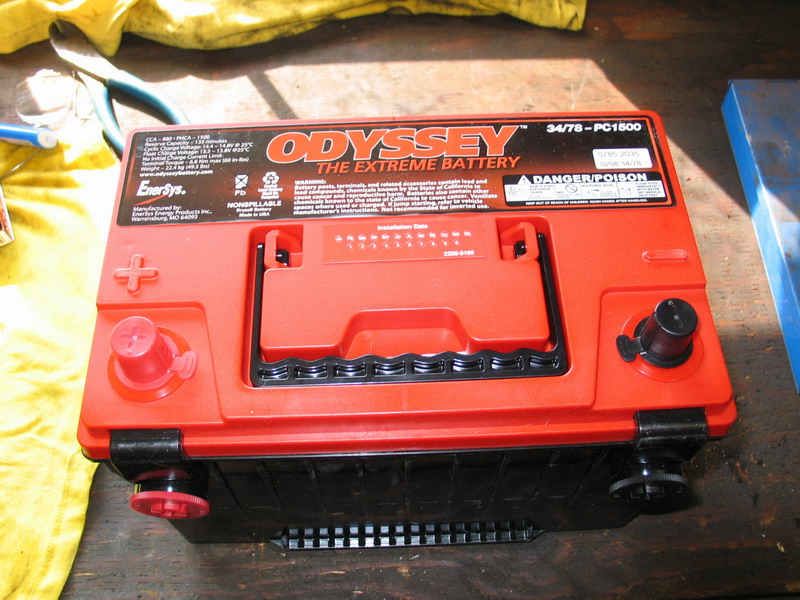 |
In order for the Ready Welder to perform to its potential, it is essential to use good quality 12v automotive / marine batteries. I prefer Odyssey batteries, even though they cost quite a bit more than normal batteries. |
|||||||||||||||||||||||||||||||||||||||||||||||
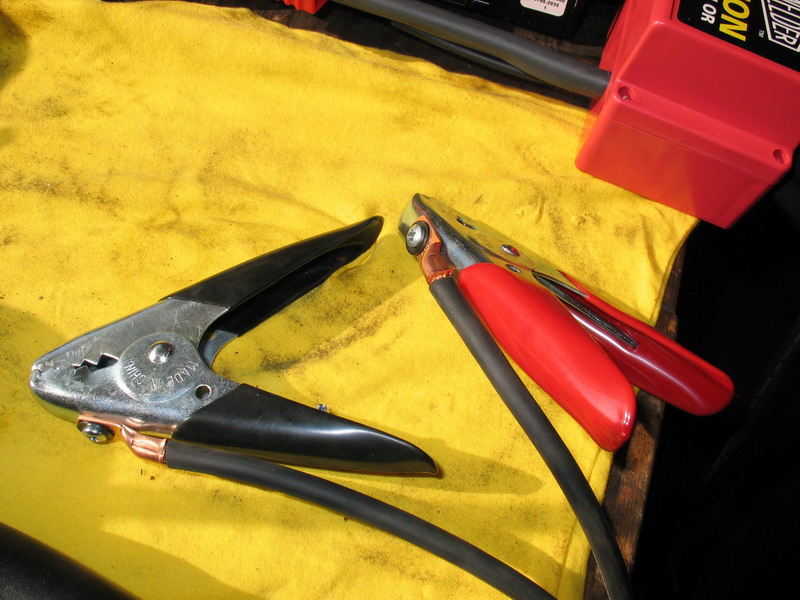 |
If you are going to use the supplied battery terminal clamps to connect either the "series" cable to the batteries, or the RWII power cables to the batteries, first connect the applicable cables to the clamps using the screws included in the small plastic accessory bag. | |||||||||||||||||||||||||||||||||||||||||||||||
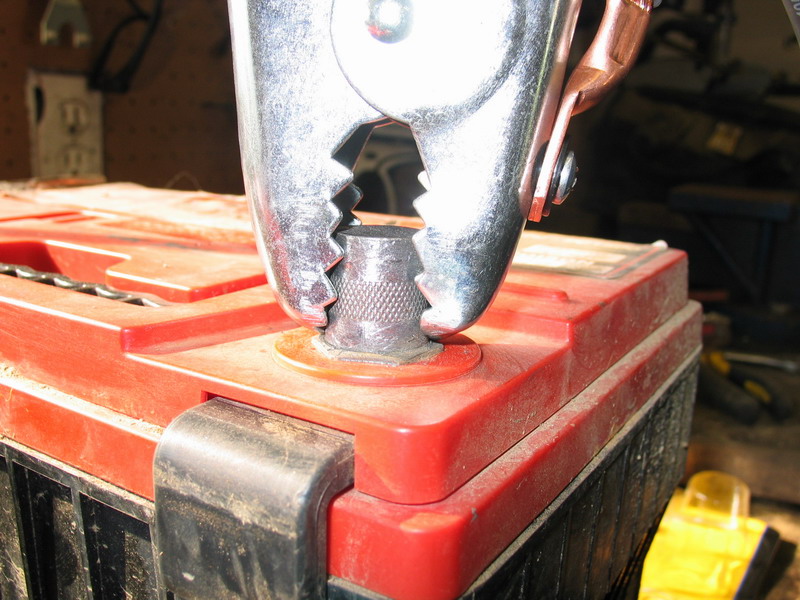 |
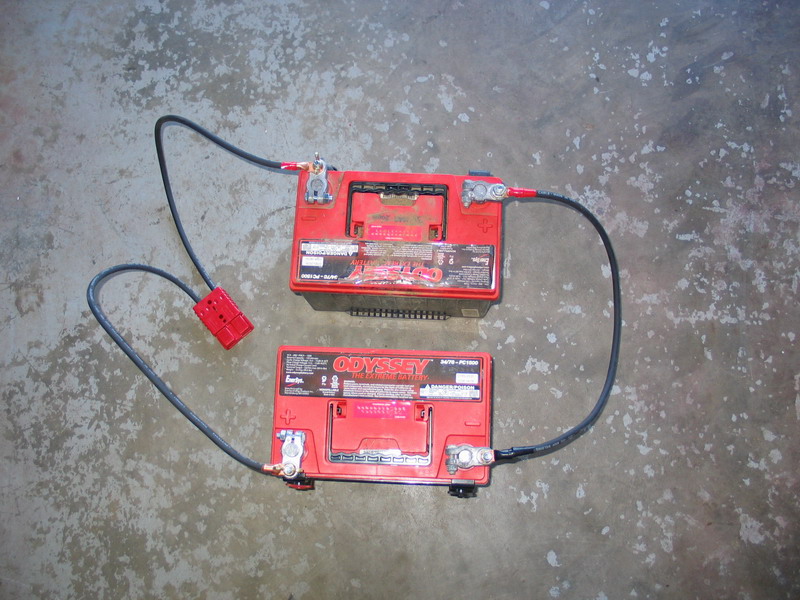
The next few pics illustrate the RWII hooked up to two batteries in series using the battery terminal clamps to connect the RWII power cables. However, although the battery terminal clamps are convenient, they don't offer the best possible contact between the cables and the batteries, as can be seen in this pic. |
|||||||||||||||||||||||||||||||||||||||||||||||
 |
A much better option for all connections, is to use marine battery terminals that have a lug-and-wingnut connection. This style of connection offers both reasonable convenience and excellent conductivity. The first few of the following pics show this style terminal used to connect the two batteries together with the RW supplied series cable. |
|||||||||||||||||||||||||||||||||||||||||||||||
 |
First, connect the (+) terminal of one battery to the (-) terminal of the other using the supplied series cable. Here I am using marine battery terminals to do so. Next, because I have installed flux-core wire, I need to connect the Ready Welder power cables to the pair of batteries in "straight polarity", also known as DCEN or "Direct Current, Electrode Negative". Since the electrode (wire) must be negative for flux-core welding, the (+) cable of the RWII's power cables connects to the remaining (-) terminal of the battery pair; and the RWII's negative cable connects to the final (+) battery terminal. |
|||||||||||||||||||||||||||||||||||||||||||||||
| The batteries are now properly connected for flux-core welding, and all that remains is to plug the RWII quick-disconnect together, check the polarity light, pull the trigger and burn some wire! | ||||||||||||||||||||||||||||||||||||||||||||||||
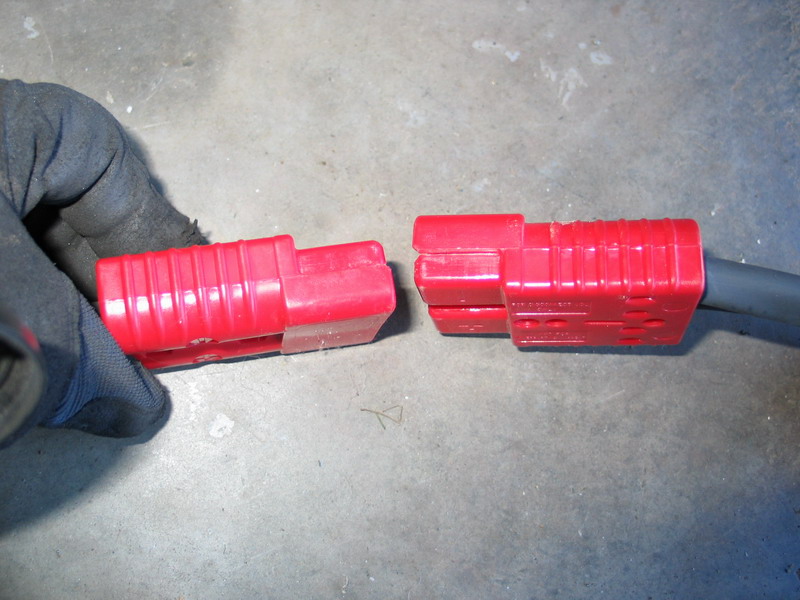
 |
The red quick-disconnect only goes together one way. This means that, to change polarity to go from flux-core to |MIG welding, you must do so at the battery connections. |
|||||||||||||||||||||||||||||||||||||||||||||||
 |
RWII connected in DCEN for flux-core welding. To connect in "Direct Current Electrode Positive" (DCEP) for MIG welding, simply reverse the RW power cable connections at the batteries - that is, connect the (+) cable to the (+) terminal and the (-) cable to the (-) terminal of the battery pair. |
|||||||||||||||||||||||||||||||||||||||||||||||
 |
The polarity indicator lights are located on the gun, just above the wire-speed adjustment knob. Red indicates DCEN for flux-core. |
|||||||||||||||||||||||||||||||||||||||||||||||
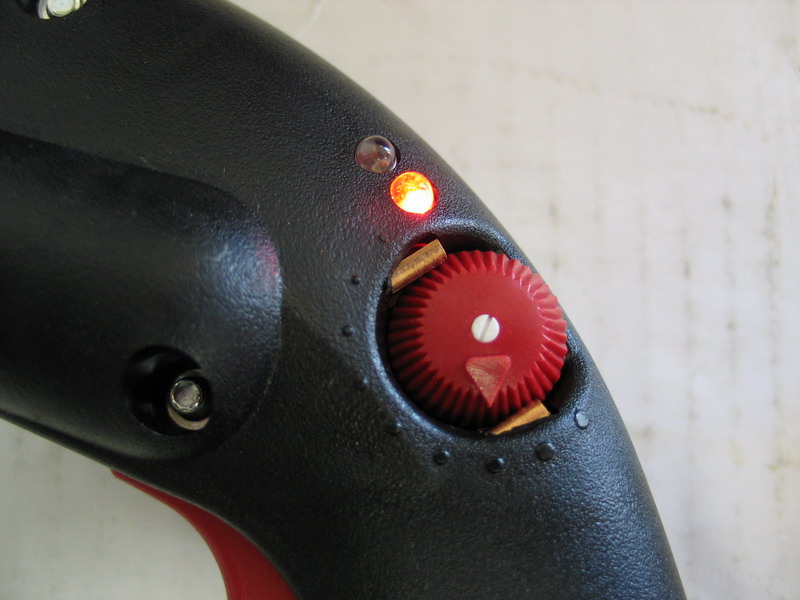 |
Close-up of the red polarity light. | |||||||||||||||||||||||||||||||||||||||||||||||
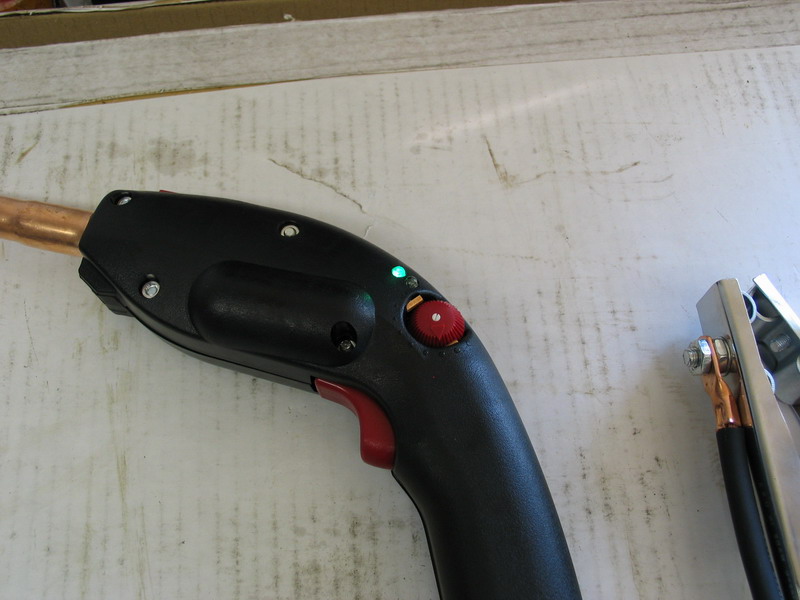 |
Green indicates DCEP for MIG. | |||||||||||||||||||||||||||||||||||||||||||||||
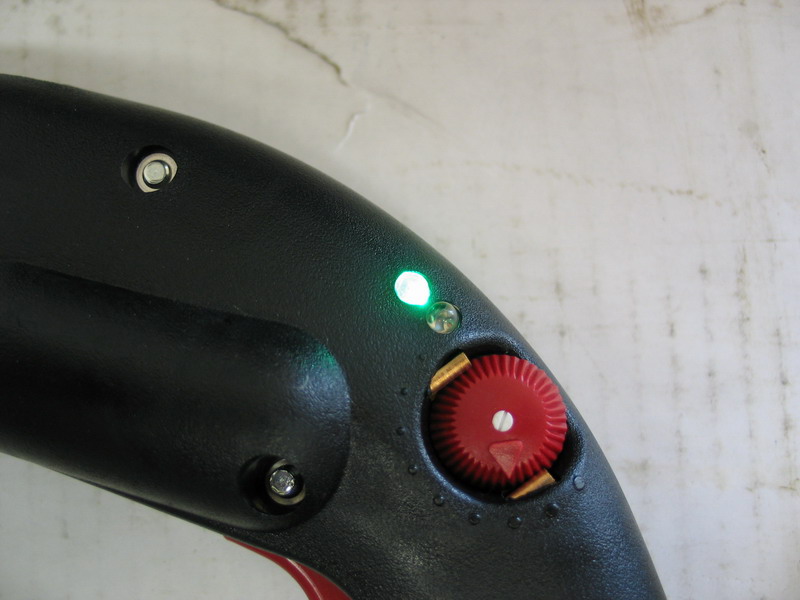 |
Close-up of the green polarity light. | |||||||||||||||||||||||||||||||||||||||||||||||
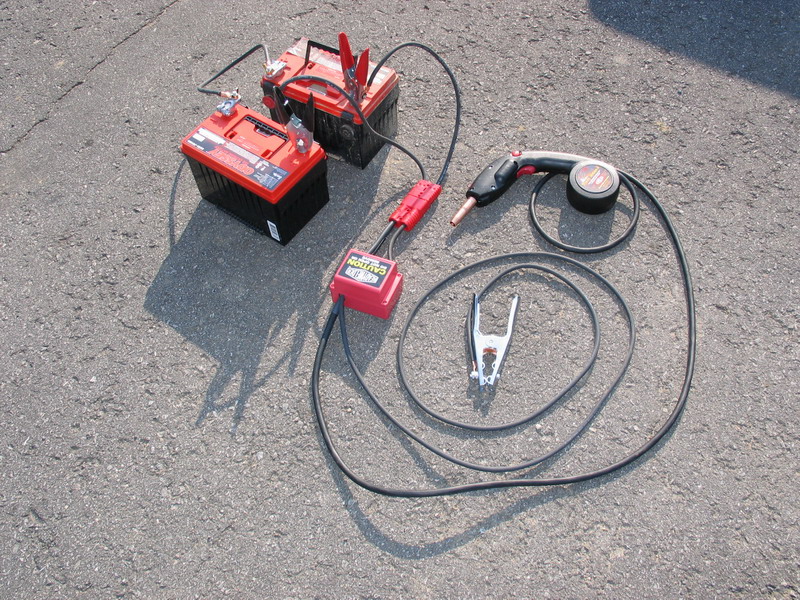 |
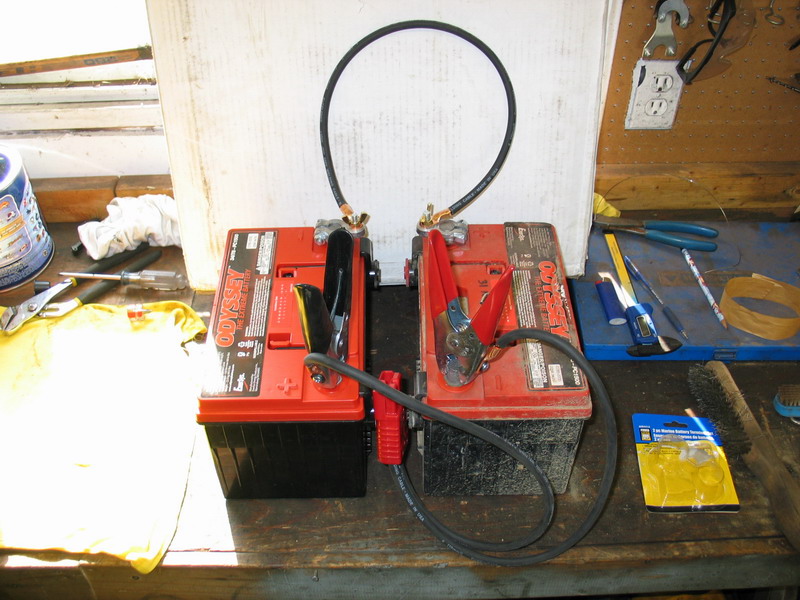
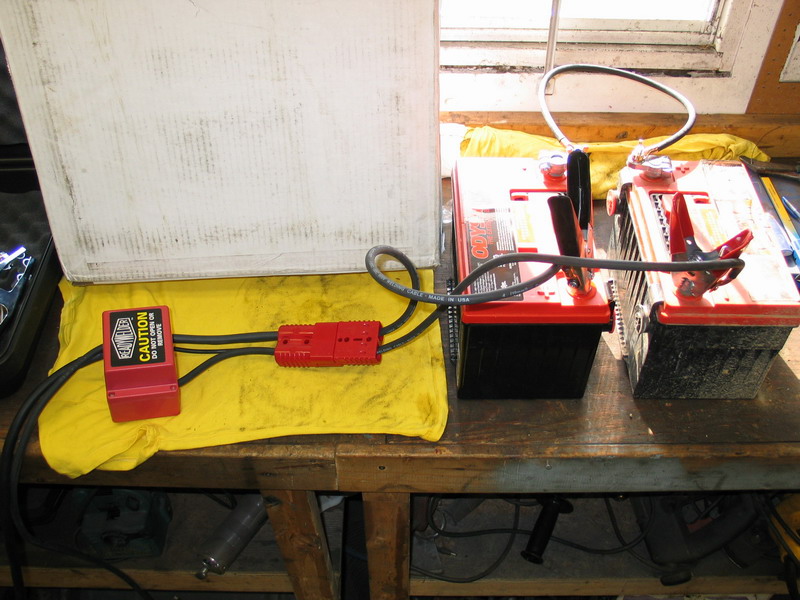
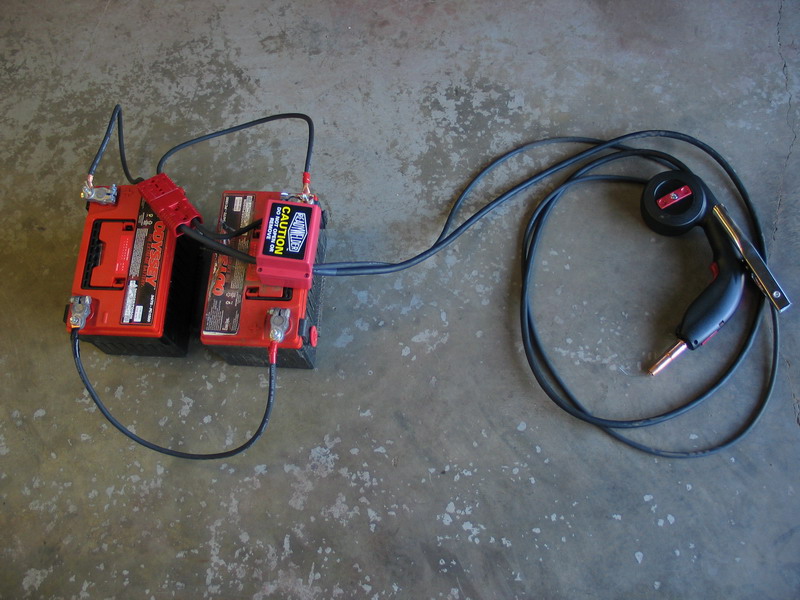
RWII Model# 10000-CS all hooked up for flux-core welding with two 12v batteries in series providing 24v and up to 275 amps. | |||||||||||||||||||||||||||||||||||||||||||||||
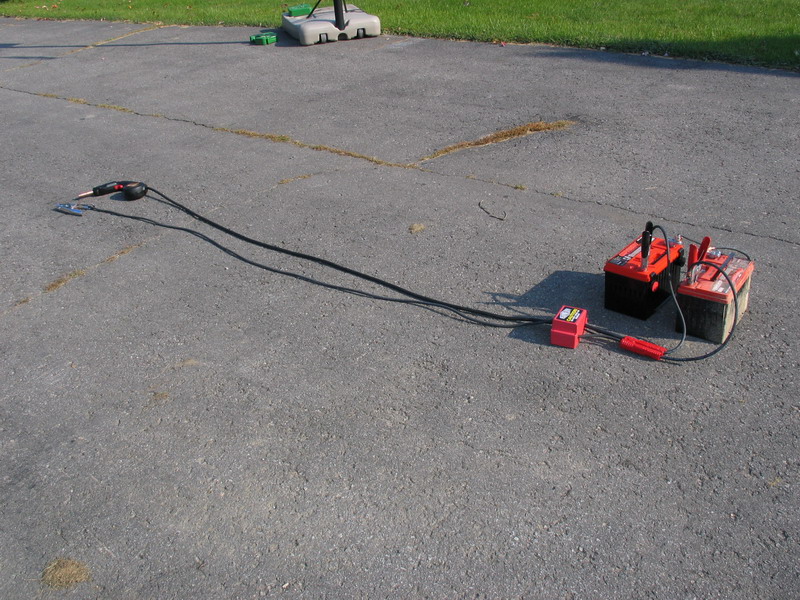 |
The model# 10000-CS power cables are 10 feet long, allowing you to reach anywhere and welding to take place a safe distance from the batteries. | |||||||||||||||||||||||||||||||||||||||||||||||
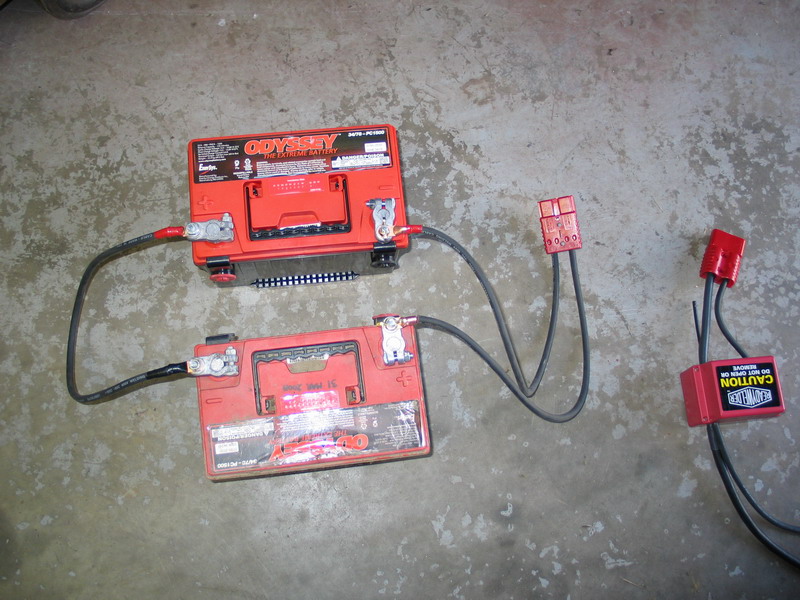 |
Here, you can see I have re-done the RWII attachments to eliminate the battery terminal clamps. I had to purchase four marine battery terminals to do so (not included in the kit), and the set up is slightly less convenient, but the connectivity is vastly improved and well worth it in my opinion. Note the cold switch option - well worth the nominal extra charge for any Ready Welder setup for convenience and safety. |
|||||||||||||||||||||||||||||||||||||||||||||||
 |
Remember how I said that the quick-disconnect only goes together one way and therefore polarity changes must be made at the battery? If you look closely, you can see that I marked the (+) side of the power cable with a small piece of red electrical tape. This helps me when making the connections to the batteries. Now all I have to remember is: Series cable - connect (+) to (-) Power cable - red to neg for flux-core |
|||||||||||||||||||||||||||||||||||||||||||||||
 |
With the batteries connected and the polarity set, connect the quick-disconnect... | |||||||||||||||||||||||||||||||||||||||||||||||
 |
...and you're ready to burn wire! I'm using 24v and .035 flux-core wire. |
|||||||||||||||||||||||||||||||||||||||||||||||
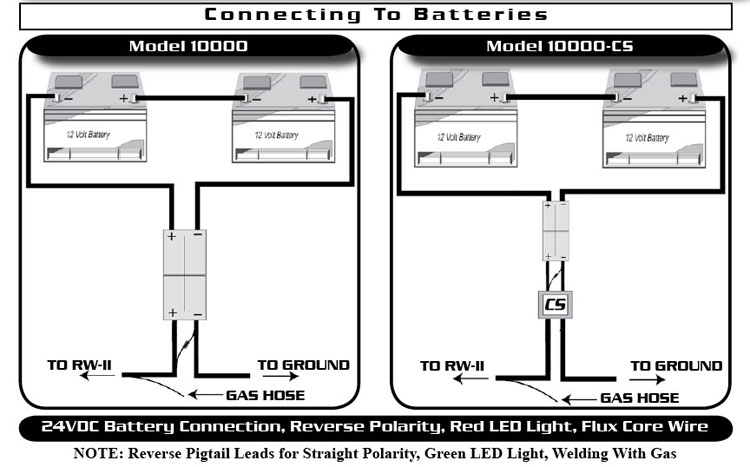
Ready Welder II Model# 10000 battery Connection Schematic
Welding with the Ready Welder II Model# 10000-CS |
||||||||||||||||||||||||||||||||||||||||||||||||
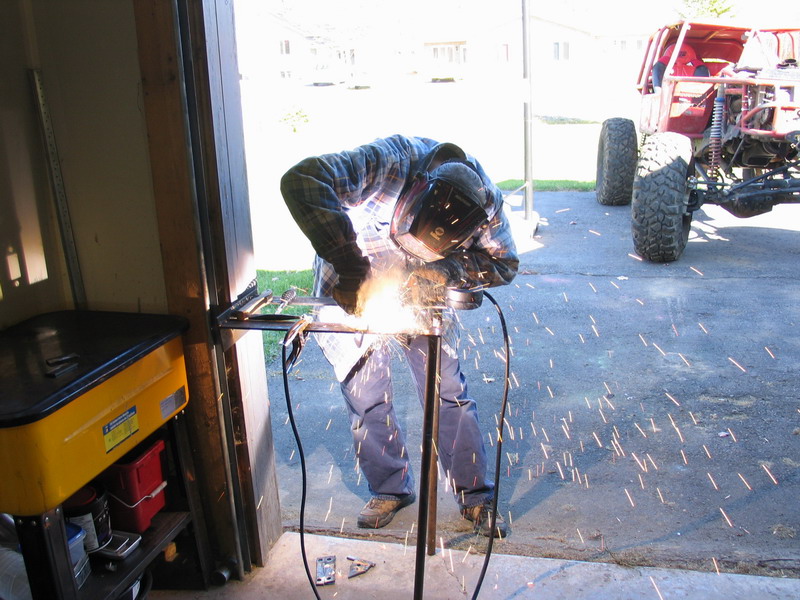
 |
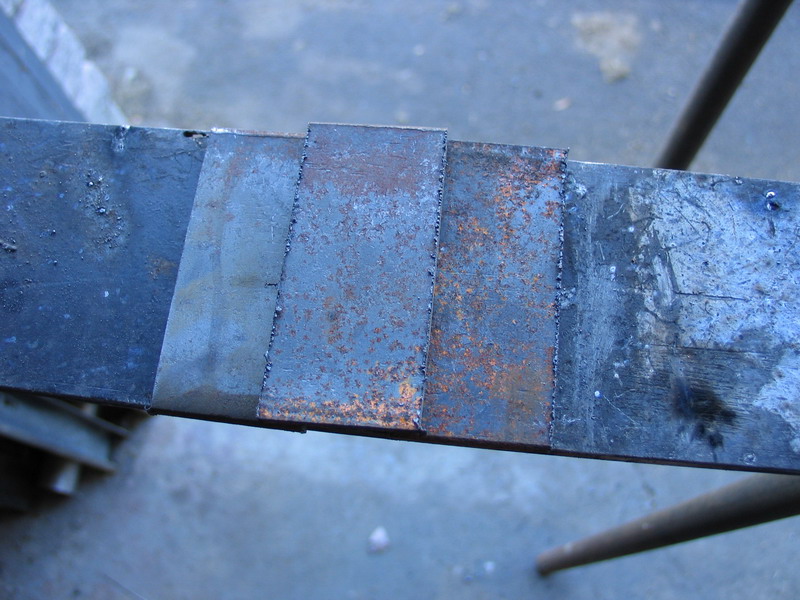
I made a bunch of coupons from 1/8", 1/4", and 1/2" mild steel... | |||||||||||||||||||||||||||||||||||||||||||||||
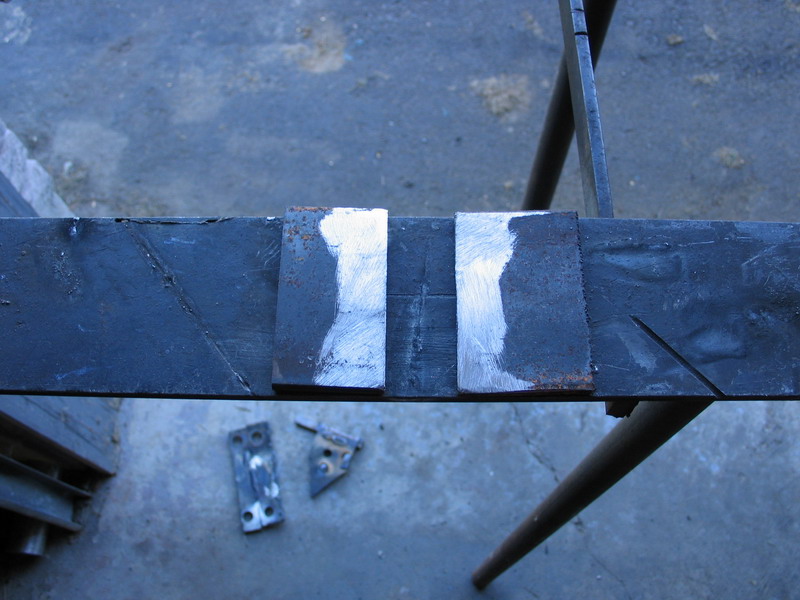 |
...then cleaned the rust and scale off most of the coupons. | |||||||||||||||||||||||||||||||||||||||||||||||
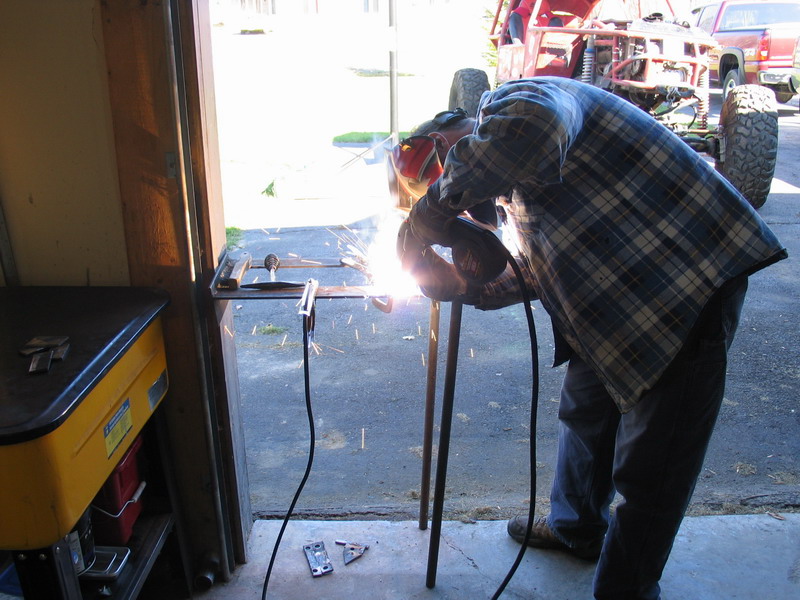 |
As I was busy with the photography, my spotter and crew-chief, Justin Myles, came over to lend a hand. I think he wanted to see what the little machine could do too! We actually took turns trying out the welder for the first time, but I didn't keep track of who did what - so in the following pics, if the weld looks decent it was probably his, and if it looks poor - it was probably mine! |
|||||||||||||||||||||||||||||||||||||||||||||||
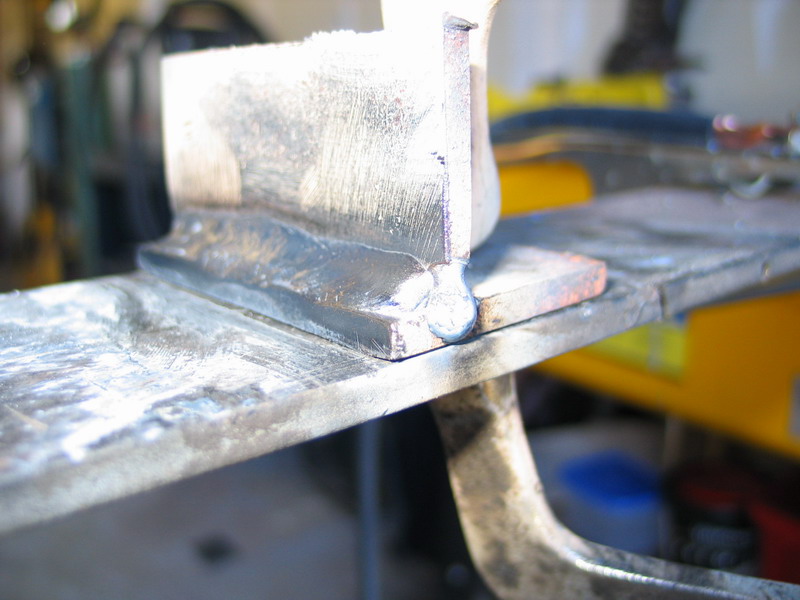
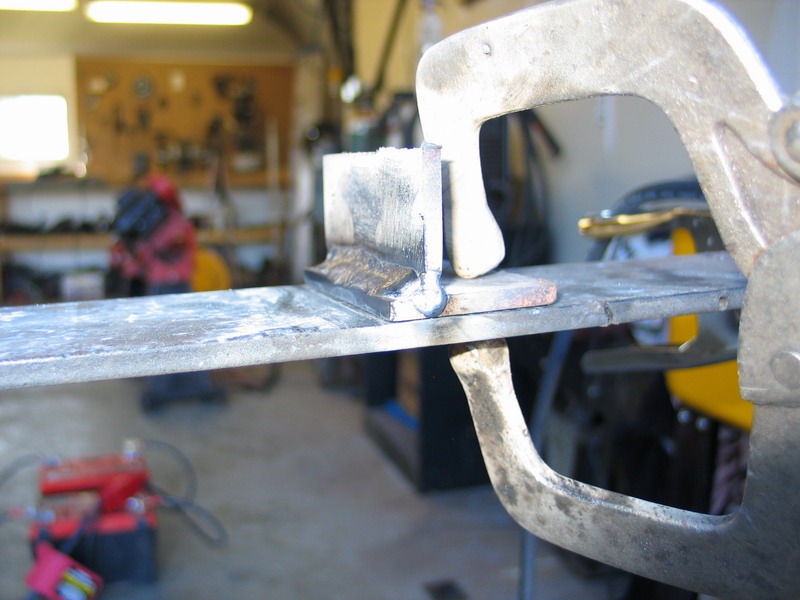
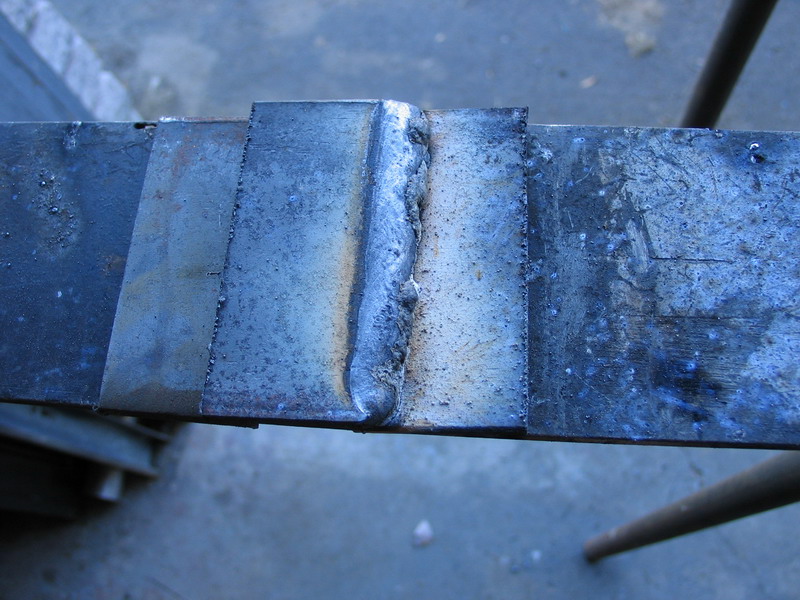
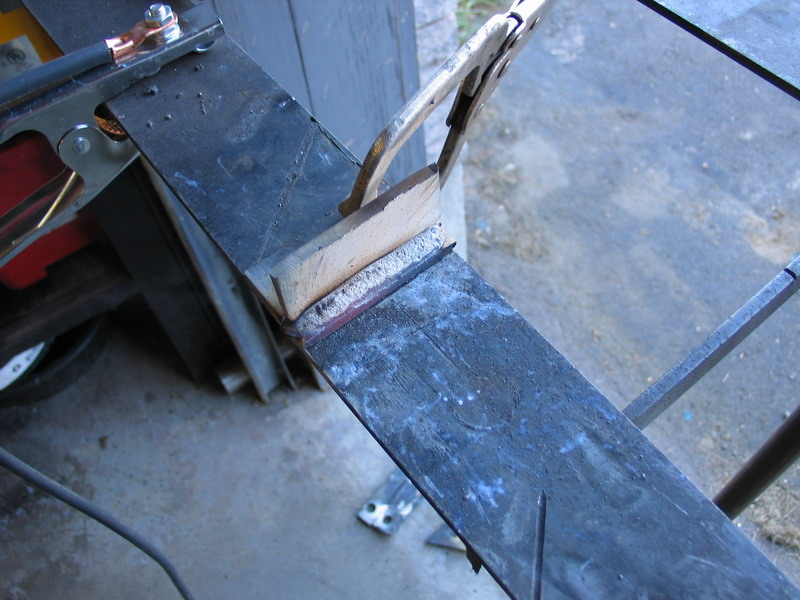 |
A 1/4" T-joint. |
|||||||||||||||||||||||||||||||||||||||||||||||
 |
One thing's for sure - this welder connected to two fully-charged good-quality batteries REALLY throws down the heat. The settings take some getting used to - you can actually blow right through 1/4" plate...awesome! |
|||||||||||||||||||||||||||||||||||||||||||||||
 |
Full penetration is no problem and we were getting decent looking welds in just a few minutes - and neither of us is a professional welder by any means. | |||||||||||||||||||||||||||||||||||||||||||||||
 |
That said - it takes some getting used to, especially if you're unfamiliar with using really powerful welders. I recommend cutting some coupons and practicing in the garage before packing the Ready Welder on the trail. |
|||||||||||||||||||||||||||||||||||||||||||||||
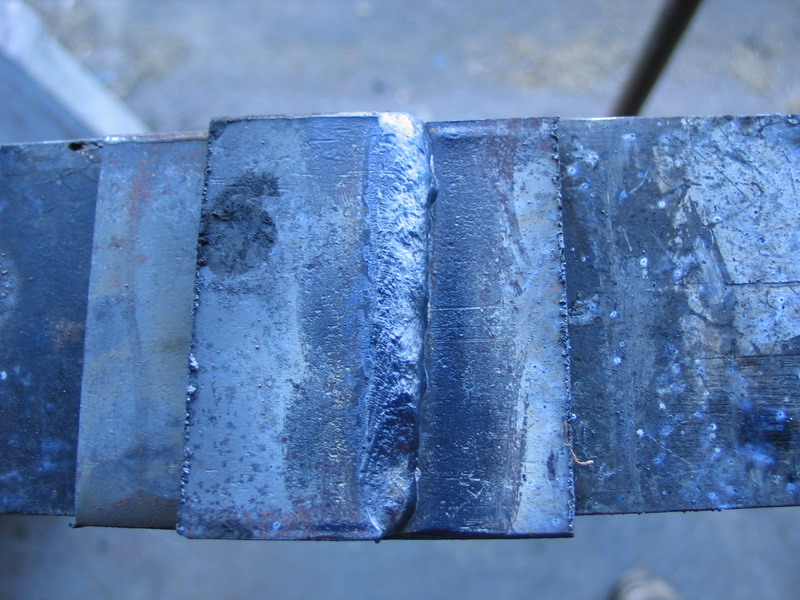
 |
Some butt weld practice. | |||||||||||||||||||||||||||||||||||||||||||||||
 |
Lap joint | |||||||||||||||||||||||||||||||||||||||||||||||
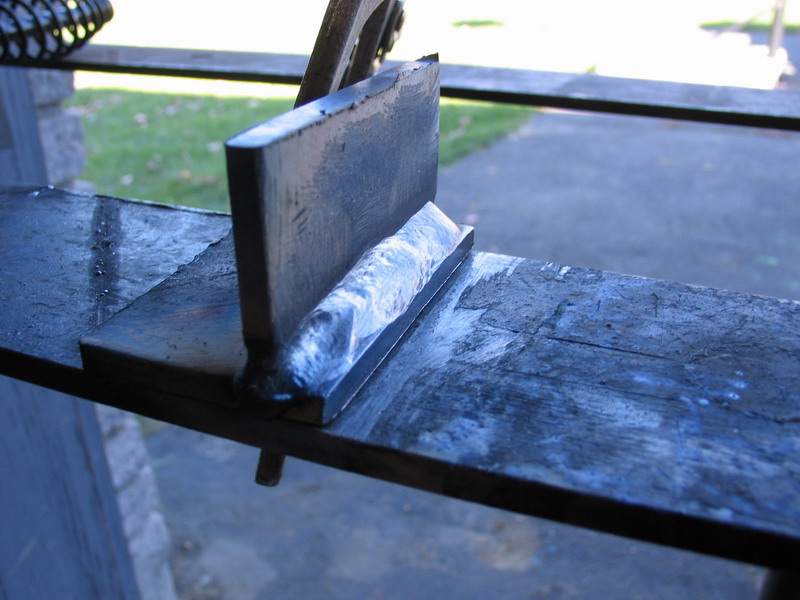
 |
T-joint | |||||||||||||||||||||||||||||||||||||||||||||||
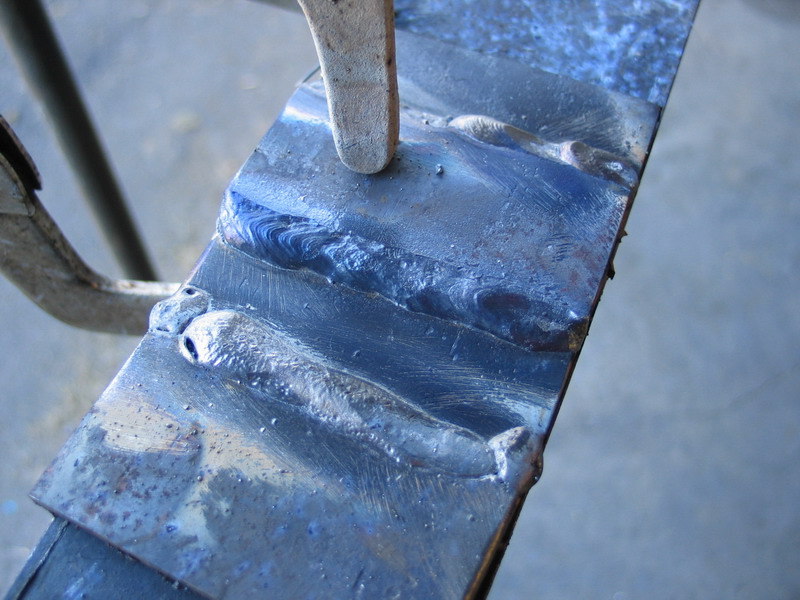
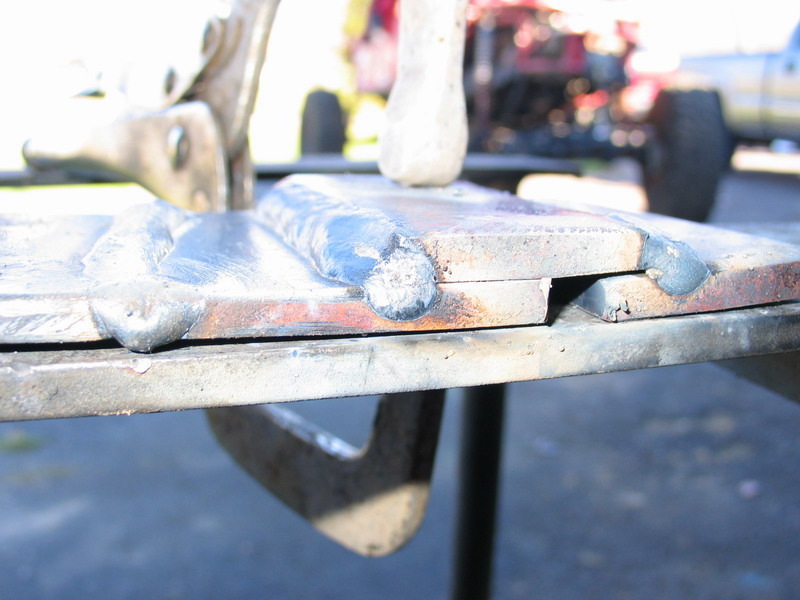
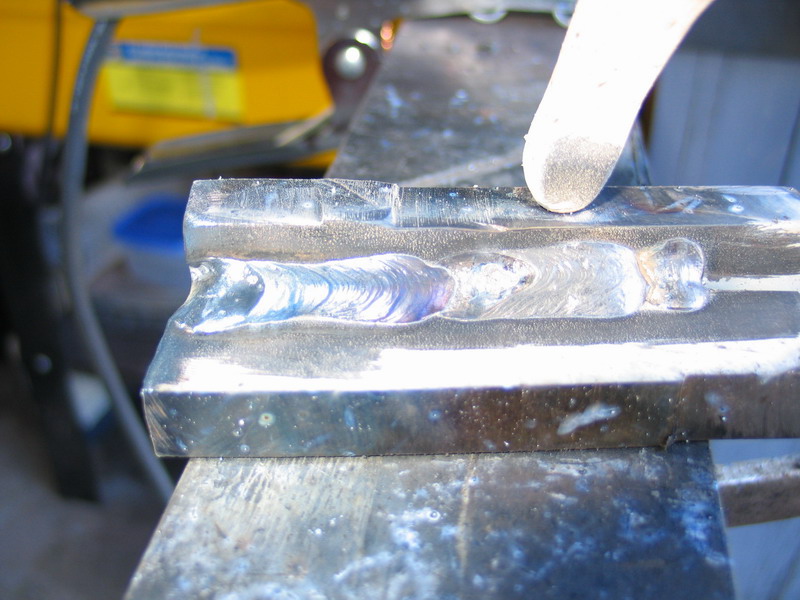 |
I only had a very limited supply of 1/2" plate, so wasn't able to refine my technique enough to lay a perfect bead... | |||||||||||||||||||||||||||||||||||||||||||||||
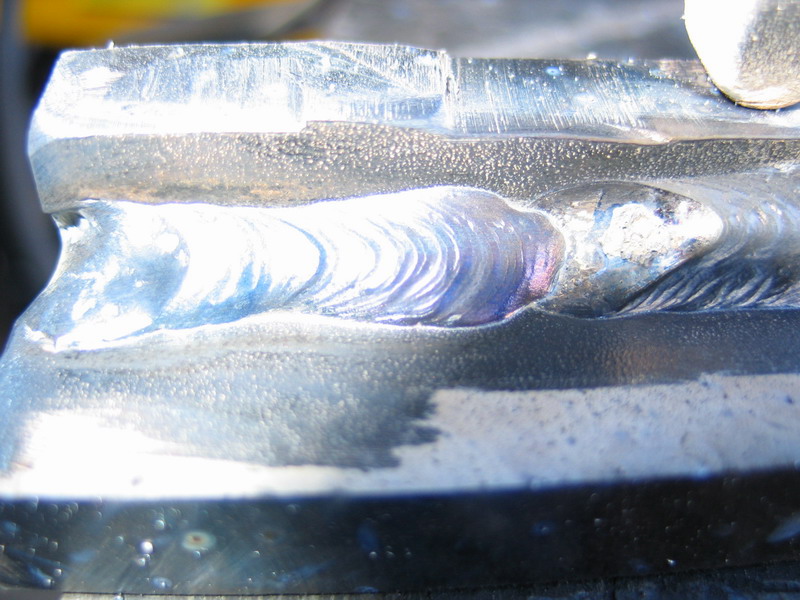 |
... but as you can tell from the undercut at the far left, the RWII has more than enough power to single-pass 1/2" steel plate! | |||||||||||||||||||||||||||||||||||||||||||||||
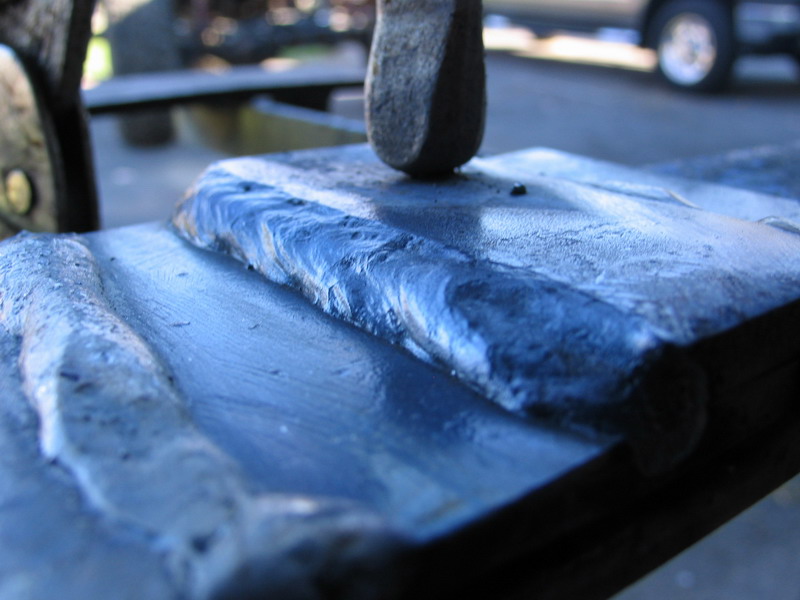
 |
The underside of this 1/8" plate shows that you need to watch the settings when welding 1/8" plate with .035 wire and 24v, otherwise it will easily penetrate to the point of burn-through. | |||||||||||||||||||||||||||||||||||||||||||||||
 |
By keeping the wire speed down and the travel speed up, we were able to produce decent butt-welds on the 1/8". | |||||||||||||||||||||||||||||||||||||||||||||||
 |
Now, we all know that in welding, like painting, 80% of the work is in the prep. However, I also know I'll be using the Ready Welder a lot out on the trail where conditions will be imperfect and the time and tools to conduct proper cleaning and prep will be very limited. So I decided to try some practice beads on dirty, rusty, unprepared steel like this. |
|||||||||||||||||||||||||||||||||||||||||||||||
 |
Using the flux-core wire on this dirty mess... | |||||||||||||||||||||||||||||||||||||||||||||||
 |
... still produced a perfectly acceptable weld - even when wielded by my untalented hand! | |||||||||||||||||||||||||||||||||||||||||||||||
 |
When all was said and done, we burned through the one pound spool of wire in fairly short order. Altogether we laid about 8 feet of bead on a mixture of 1/8", 1/4" and 1/2" mild steel plate, all with 24v and .035 flux-core wire. In that time, after laying that much weld, the batteries' voltage dropped from a fully-charged 12.7 volts to a 90% discharged state with one registering 11.93 volts and the other 11.91 volts. |
|||||||||||||||||||||||||||||||||||||||||||||||
Connecting the Ready Welder II Model# 10000 to a MIG Machine Power SupplyRecall from our discussion on the different RWII models that the #10000 can be connected to a constant voltage MIG machine, and that the #10000ADP and #10250 can be connected to a constant voltage MIG machine or a constant current stick machine. The difference is that the latter two models come with a small ac to dc power converter supply that you plug into a standard 110v outlet. This small converter takes household ac current and converts it to the DC current required to run the circuit board and the wire feed motor in the gun. If you try to power these gun controls with AC power (by plugging a #10000 into a stick machine, or not hooking up the small converter with either of the other two models) you will destroy the circuit board and wire feed motor in short order. BUT - there is one additional caveat. When connecting a Model#10000 to a CV MIG machine, you MUST ensure that the max voltage supplied by the machine is no more than 40v. In fact, the gun controls are "happiest" at 24-36v, having been designed for this DC voltage. The circuit board in the RWII is the electronic "brain" of the machine and will not tolerate AC current, DC voltage spikes, or high voltage DC current (above 40v). So, the bottom line is this: Yes, you can connect your #10000 to a CV MIG machine IF you can adjust the machine's output to remain at <40v DC. However, if you plan on using the RWII a lot as a spool gun, your best bet is to get a model #10000ADP or model# 10250 and use the supplied AC to DC converter. Let's have a look at how to tell if your MIG machine is constant voltage, and if it is, how to safely hook up the #10000. (by the way - if you happen to screw up and connect any RWII model incorrectly and fry the circuit board / wire feed motor, all is not lost. You can order a replacement board / motor combination for a very reasonable fee and replace it yourself without too much difficulty). |
||||||||||||||||||||||||||||||||||||||||||||||||
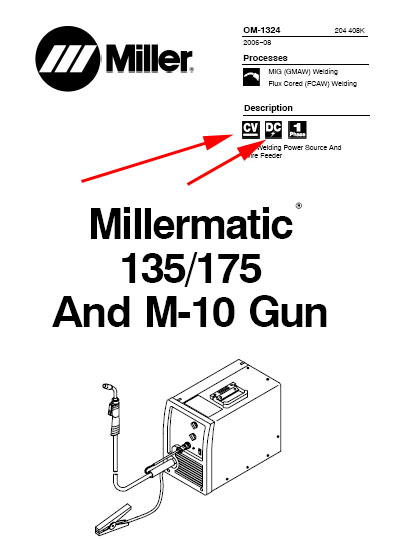 |
Your MIG machine should have an indication, either in the manual, or on the machine itself, that it's a constant voltage DC machine. Most are. The cover of the manual for my Miller clearly indicates that it is. The small icon showing the underlined letters CV indicate that it is a constant voltage machine. The small icon showing the letters DC with a small lightening bolt underneath indicate that the produced welding current is direct current or DC. So far so good. |
|||||||||||||||||||||||||||||||||||||||||||||||
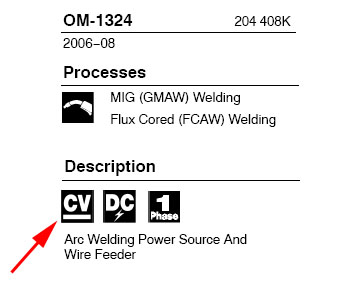 |
Close up of the icons. | |||||||||||||||||||||||||||||||||||||||||||||||
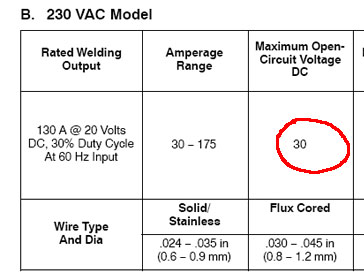 |
The next step is to check the machine's specs and ensure the maximum voltage is less than 40 volts, and preferably between 24-36. This shows my machine's max voltage is 30v, so I'm good to go.
|
|||||||||||||||||||||||||||||||||||||||||||||||
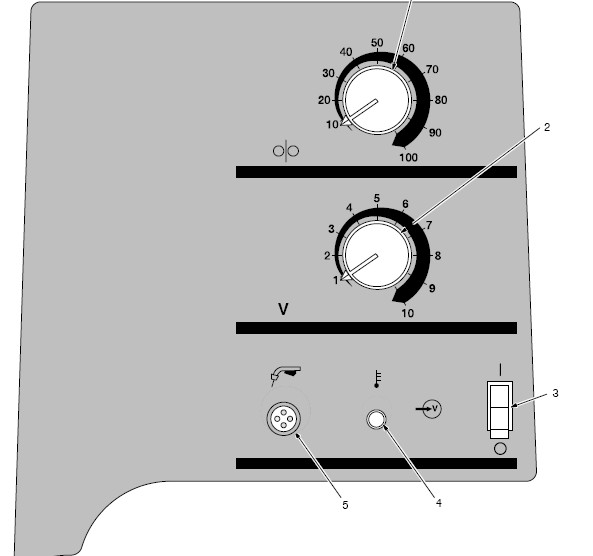 |
Of course, the machine itself will have a voltage control knob - shown here (#2) in the middle of the control panel, labelled V and graduated from 1-10. If your machine will put out more than 40 volts, you could, theoretically, use a volt meter and measure the machine's open circuit voltage at different settings and make sure you do not exceed 40v, but I wouldn't recommend it because you really risk damaging the RWII and you also limit the adjustments you can make during welding - more on that in a second. |
|||||||||||||||||||||||||||||||||||||||||||||||
 |
If you're satisfied that you can safely connect your RWII #10000 to your MIG machine, the actual hookup is very simple. Begin by opening the cover... |
|||||||||||||||||||||||||||||||||||||||||||||||
 |
... and locate the connection terminals, seen at the top right in this picture. Release the wire feed tension and turn the wire feed speed control to zero. |
|||||||||||||||||||||||||||||||||||||||||||||||
 |
Connect the RWII leads to the MIG machine's terminals, observing correct polarity for the type of welding you will be doing, just as you would when connecting to batteries. This diagram illustrates the correct connections. |
|||||||||||||||||||||||||||||||||||||||||||||||
 |
Before you can weld, you will have to close the MIG machine's contractor. The simplest way to do this is to zip-tie the MIG machine's gun trigger in the closed position. You can now plug in the MIG machine, turn on its power switch, connect the Ready Welder II's ground clamp to the work (the MIG machine's ground clamp is not used in this configuration), check the polarity light on the RWII gun, pull the trigger, and weld away! When connected to a a CV MIG machine in this manner, the RWII can be adjusted using it's own wire feed speed control (on the RWII gun) and the voltage control knob on the MIG machine. Remember what I said about not wanting to limit this adjustability? If the MIG machine outputs >40 volts it would be best to use the RWII AC/DC converter freeing yourself to use the MIG machine's full range of voltage control to adjust the welding.
|
|||||||||||||||||||||||||||||||||||||||||||||||
Ready Welder II Model# 10000 CV MIG Machine Connection Schematic
Connecting the Ready Welder II Model# 10000-CS to a Gas Supply for MIG (GMAW) WeldingThe final thing we'll look at is how to hook up the RWII to a gas supply so that you can use solid wire and conduct MIG welding. |
||||||||||||||||||||||||||||||||||||||||||||||||
 |
The small black hose at the cold switch is the gas line that feeds the gas to the gas valve in the Ready Welder gun. | |||||||||||||||||||||||||||||||||||||||||||||||
 |
Use the small white fitting to connect the supplied clear gas hose to the gas line at the cold switch. | |||||||||||||||||||||||||||||||||||||||||||||||
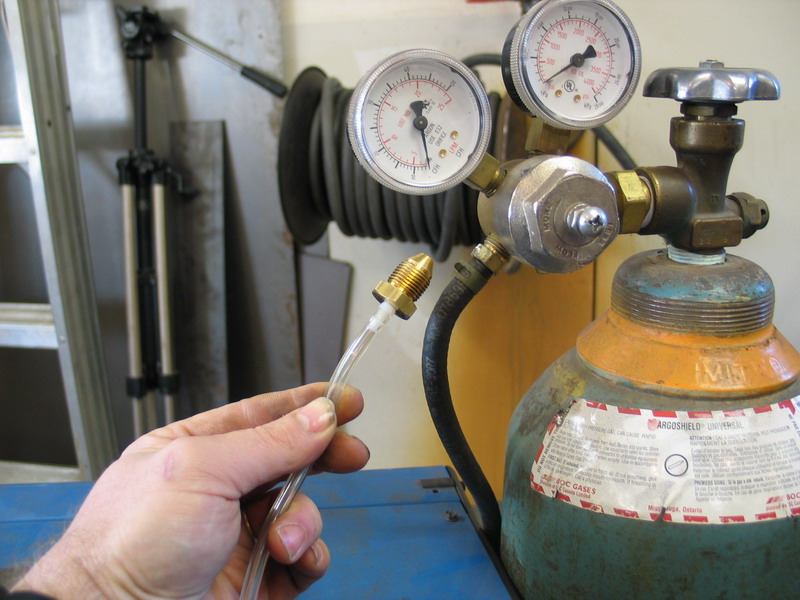 |
Connect the other end of the clear gas hose to the supplied fitting, and then thread that fitting into your gas supply regulator. Turn on the gas at the bottle, adjust the flow rate with the regulator, and you're welding with gas - it's that easy! |
|||||||||||||||||||||||||||||||||||||||||||||||
Notable Points & Tips on Using the Ready WelderThe following are some observations & tips drawn from my research on, and use of, the Ready Welder II: - For optimum wire feeding, be sure to adjust the wire feed tension lever in the gun for different materials and wire sizes. It's particularly important to reduce wire feed tension for soft aluminum wire - One of the reasons spool guns are used with normal welders for aluminum welding is because they dramatically reduce the distance the soft wire has to feed. This advantage is present in the RWII for all wires - they only have to feed a distance of about 10". - If you have trouble with wire feeding, try these tips:
- Driving the gun hard without due care and attention to smooth, even wire feeding may cause the plastic gears to strip. - The wire-feed control is right on the gun, making it easy and convenient to adjust right at the work. However, the knob turns very freely and is easy to bump or inadvertently adjust if you are not careful. I have read that one enterprising user had some success by removing the knob and coating the outside with liquid electrical tape then reinstalling it after it had dried - making it harder to turn and more secure. I haven't tried this personally and just take care not to bump the knob when I'm welding. - To remember which polarity is which for MIG or flux-core welding, remember GREEN for GAS. - If, after a lot of use, the gas valve in the gun sticks open, a tap on the case will usually remedy the issue. This may also indicate that it is time to clean / blow-out the inside of the gun and lubricate the gears, rollers, and gas valve slide. Use oil SPARINGLY - a tiny drop will do! - Be sure to setup and try out the RWII in the garage / shop before needing it on the trail in the cold... when it's dark... and raining... and you're late for beer call. - If you have an existing RWII and your needs change, you can send it in to Ready Welder and have the cold switch and/or ADP (AC/DC power converter) option retrofitted. - Due to the high power of the Ready Welder using pure DC voltage - up to 350 amps or more, make sure you use the appropriate shade of eye-protection as high amp arcs are very bright! Use the following table as a guide:
* As a rule of thumb, start with a shade that is too dark to see the weld. Then go to a lighter shade which gives sufficient view of the weld without going below the minimum. - When welding with flux-core wire, you may experience better results by using a tip one size larger than the wire size; for example, using a .035 tip with .030 wire. - While not designed to replace normal shop welders, especially in a commercial shop or production setting, the RWII would make an excellent first welder for anyone. It's far more powerful than a 110v welder, is cheaper than a 230v welder, and you don't have to wire the shop or garage for 230v service if you don't have it. There's no reason you couldn't build an entire buggy with just a Ready Welder II - you just have to work around the battery life and practice good battery management. - You must always completely disconnect the batteries that power the RWII from the vehicle(s) before welding - especially if you are welding on the host vehicle, otherwise damage to the electrical components of the vehicle can occur. - Hugh quality, deep-cycle or hybrid batteries in good condition are best for welding with the RWII. However, on the trail or in the back woods, any pair of 12v automotive batteries will do for most emergency repair jobs. - I used an entire 1lb spool of .035 flux-core wire on two batteries, making approximately 8 feet of weld bead on mostly 1/4" steel, and still had enough battery power in a single battery to start the Chevy 350 V8. This took the batteries from a fully charged state of 12.7 volts to an almost completely discharged 11.91 volts. Being high-quality Odyssey batteries they re-charged to 100% easily using a specially designed computer-controlled charger designed for AGM batteries. - When testing batteries, use the following tables, depending on if you are testing the voltage with a load on the batteries, or with no load (open circuit):
- While there is no direct control of amperage on the RWII, the following will all have an effect on the amperage / amount of heat being delivered to the weld, and can be adjusted as required:
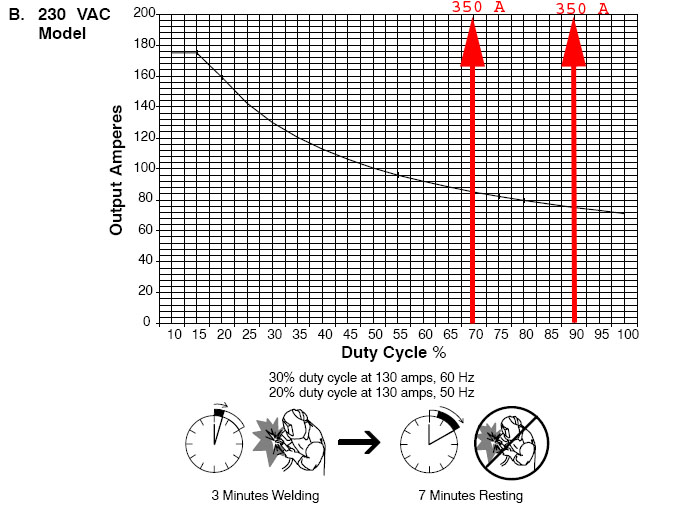
By using the appropriate combination of the above factors you can satisfactorily weld anything from 22ga sheet-metal to 3.4" thick steel plate. - Since the RWII uses pure 12 volt DC current when connected to batteries, its duty cycle is almost unlimited; unlike other MIG welders that have inverters to convert AC to DC current. The RW-II is rated at 100% Duty Cycle for MIG welding (GMAW), and 70% Duty Cycle when welding with flux-core wire (FCAW). This is because, at normal flow rates, the shielding gas used in MIG welding provides enough cooling power to drop the temperature of the tip. It is recommended that if you are going to be frequently using the RWII for long periods of time that you do so on the basis of a 90% duty cycle , to avoid overheating the front end consumables or gun components. Of course, that 90% translates into nine minutes of continuous welding with only one minute of cool down before the next nine minutes of continuous welding. Unless you are working on very long sections and have someone else available to do all the cleaning and fit-up for you as you go, that would be almost impossible to achieve - you'd probably have to pause for more than one minute in ten anyway. Here's a chart of a 230v MIG welder's duty cycle with the RWII duty cycle superimposed in red for comparison:
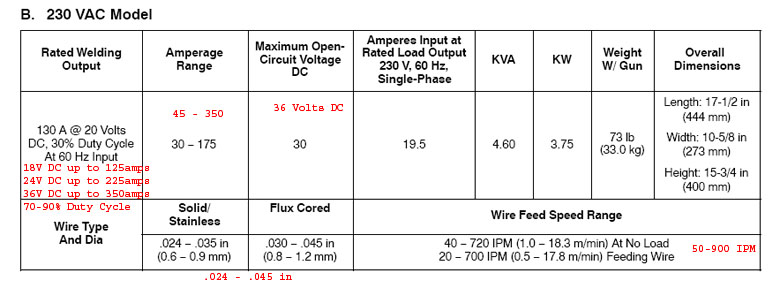
- Many factors will determine the length of acceptable-quality welding time when using battery power. The primary factors are the the type and size of batteries used and the type of welding being performed. The thicker the metal being welded, the greater the amperage draw will need to be to obtain satisfactory results, and the more quickly the batteries will be drained. The size and amp-hour ratings of the batteries used will determine the total amount of power available and thus the welding time available. Ready Welder recommend using deep cycle AGM (Absorbed Glass Matt) batteries, or at least group 31 marine deep-cycle batteries as a power source for the Ready Welder II. A fully charged pair of large, high-quality batteries will normally yield a minimum duration of about 45 minutes of actual trigger-pulled welding time when welding 1/2" steel or 3/4" Aluminum @ approximately 175 amps. Lighter duty welding operations on thinner metal can offer a duration of four hours or more. - The secret to the Ready Welder's enormous power and awesome penetration is the use of pure DC power. Shop welders must first convert AC power to DC power before welding can take place. This consumes electrical power, reduces duty-cycle time, and produces heat. As such, a normal shop MIG welder's power supply is rated at a particular amperage capability. Batteries do not have any such limitations, as long as there is path large enough for the current to flow, it will do so. For example, the RWII can only penetrate 3/4" if the batteries and cables can deliver 400amps - which three quality 36v batteries can do. Very few shop welders have power supplies that can provide 400amps. For example, the diagram below illustrates the specs and limitations of a typical 230v shop MIG welder (and a good one at that); and has the Ready Welder II specs added in red for comparison:
|
||||||||||||||||||||||||||||||||||||||||||||||||
|
||||||||||||||||||||||||||||||||||||||||||||||||

|
Sources: Ready Welder Corporation811 East G Street, Suite A PolyPerformance870 Industrial Way |

|